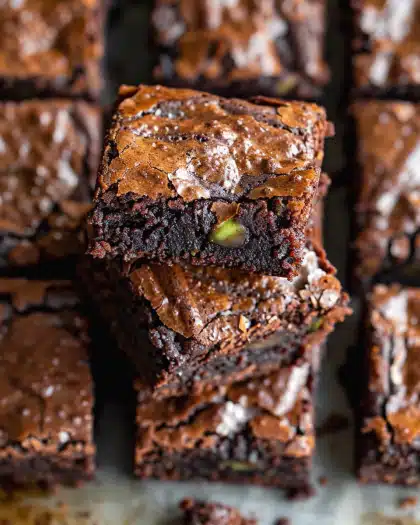
I absolutely adore sharing this Caramelitas Recipe with you because it combines everything I love in a dessert: chewy oats, gooey caramel, and melty chocolate, all wrapped into a perfect bar. Whenever I make these, the irresistible aroma fills my kitchen and I can barely wait to dig into that luscious caramel layer sandwiched between buttery cookie crusts. These bars feel like a warm hug on a plate and have quickly become my go-to treat for family gatherings, weekend indulgences, or even as a thoughtful homemade gift.
Why You’ll Love This Caramelitas Recipe
In my eyes, this recipe stands out because of its rich, layered flavor profile that hits all the right notes. The slightly nutty taste of old-fashioned oats combined with the buttery cookie base creates an exceptional texture that’s chewy and crisp in all the right places. Then there’s the luscious caramel sauce mingling with chocolate chips — it’s like a symphony for your taste buds that’s both sweet and comforting without being overwhelmingly rich.
What really makes this Caramelitas Recipe a delight for me is how straightforward it is to prepare, despite the decadent results. The ingredients are simple, and the steps are easy to follow, even if you’re new to baking. Plus, it’s versatile enough to bring to almost any occasion: a weekend treat, a neighborhood party, or a cozy holiday dessert. I promise, once you try these bars, you’ll keep coming back for more, and friends will be asking for the recipe every time.
Ingredients You’ll Need

Each ingredient in this Caramelitas Recipe plays a key role, from creating the perfect texture to delivering deep, rich flavors. The combination of familiar pantry staples makes this recipe accessible, while the caramels and chocolate chips add that wow factor.
- All-purpose flour: The foundation of the cookie base, giving structure without being too dense.
- Old fashioned oats: Adds a hearty chew and rustic texture that balances the sweetness.
- Salted butter (melted): Brings richness and a tender crumb to the bars.
- Light brown sugar (tightly packed): Imparts a deep molasses flavor and moistness to the base.
- Pure vanilla extract: Enhances all the flavors with its warm, aromatic notes.
- Baking soda: Helps the texture remain soft but slightly airy.
- Kosher salt: Balances sweetness and intensifies the caramel taste.
- Milk chocolate chips: Creates pockets of melted chocolate bliss throughout.
- Individually wrapped caramels: The star ingredient that melts into a luscious, creamy layer.
- Heavy cream: Ensures the caramel sauce is silky smooth and perfectly pourable.
Directions
Step 1: First, I preheat my oven to 350°F and prepare a 9×9 baking dish by lining it with parchment paper. I make sure to leave some overhang around the edges so I can easily lift the caramelitas out later. I lightly grease the parchment with nonstick cooking spray to prevent any sticking.
Step 2: Next, I combine the all-purpose flour, old-fashioned oats, melted salted butter, light brown sugar, pure vanilla extract, baking soda, and kosher salt in a mixing bowl. I stir everything just until it’s barely combined to avoid overworking the dough.
Step 3: I press half of this cookie base evenly into the bottom of the prepared baking dish and bake it for 10 minutes until it’s set but not browned. While this base bakes, I unwrap all the caramels so they’re ready for the next step.
Step 4: While the crust is baking, I make the caramel sauce by placing the unwrapped caramels and heavy cream in a small heavy-bottomed saucepan over medium heat. I constantly stir until the caramels melt completely and the sauce is smooth, taking care not to burn or scorch it. (Alternatively, you can melt the caramels and cream in the microwave in 45-second bursts, stirring until silky.)
Step 5: As soon as the base comes out of the oven, I immediately sprinkle the milk chocolate chips evenly over the warm crust so they start to soften.
Step 6: Then, I pour the warm caramel sauce evenly over the chocolate chips, making sure to cover the whole surface so every bite is luscious and gooey.
Step 7: Next, I crumble the remaining cookie base over the caramel layer. Don’t worry if there are small gaps or it looks patchy — those fill in nicely as it bakes.
Step 8: I return the pan to the oven and bake for another 20 minutes, or until the top looks golden brown and feels firm to the touch. Once baked, I let the caramelitas rest at room temperature for a few minutes before chilling them in the refrigerator for 1 ½ to 2 hours to set completely.
Step 9: Using the parchment overhang, I lift the chilled caramelitas out of the pan onto a cutting board and slice them into 16 equal portions. Now they’re ready to enjoy!
Servings and Timing
This Caramelitas Recipe yields 16 delicious bars, perfect for sharing or saving for several days of treats. The prep time is around 20 minutes, including mixing and assembling the layers. Baking time totals 30 minutes split between base and final bake. Don’t forget to factor in the chilling time of 1 ½ to 2 hours, which is essential for the caramel layer to set properly. Altogether, you’ll need roughly 2 hours and 50 minutes from start to finish, but the hands-on time is actually quite manageable.
How to Serve This Caramelitas Recipe

I love serving these bars slightly chilled or at room temperature so the layers maintain their defined texture but the chocolate and caramel feel luscious. They’re perfect alongside a hot cup of coffee or tea for an afternoon pick-me-up. For a festive twist, try plating them with a scoop of vanilla ice cream or a drizzle of warmed caramel sauce on top to make dessert feel extra special.
When hosting, I arrange the caramelitas on a decorative platter, slicing them into neat squares so guests can easily grab a piece. Garnishing with a sprinkle of flaky sea salt or a light dusting of powdered sugar adds a lovely finishing touch and highlights that sweet-salty contrast I adore. They’re also a hit at family dinners, potlucks, or holiday gatherings — I make sure to bring extra because these treats tend to disappear fast!
For beverages, I find a creamy latte or a glass of dessert wine like a tawny port pairs beautifully with the oat and caramel flavors. If you prefer non-alcoholic options, a cold glass of milk is a classic choice that complements the rich sweetness perfectly.
Variations
I often experiment with this Caramelitas Recipe to suit different tastes and dietary needs. For example, swapping milk chocolate chips for dark or semi-sweet chocolate lends a deeper, less sweet profile that balances the caramel beautifully. You could also throw in chopped nuts like pecans or walnuts for added crunch and flavor complexity.
If you need a gluten-free option, I recommend using certified gluten-free oats and a gluten-free flour blend. For a vegan twist, I’ve successfully substituted the butter with coconut oil or a vegan butter alternative and used dairy-free caramel and chocolate chips, which still create a gooey, decadent dessert that everyone enjoys.
For a flavor variation, try adding a pinch of cinnamon or espresso powder to the cookie base to enhance the caramel notes. Alternatively, you can adapt the cooking method by using a slightly larger or smaller pan—just adjust the baking time accordingly to ensure the bars set without overbaking.
Storage and Reheating
Storing Leftovers
Once cooled, I store any leftover caramelitas in an airtight container lined with parchment or wax paper between layers to prevent sticking. They keep well at room temperature for up to 3 days, though I prefer refrigerating them to maintain the caramel’s firmness for up to a week.
Freezing
This recipe freezes beautifully! I carefully wrap individual bars in plastic wrap and place them in an airtight freezer-safe container or zip-top bag. They stay fresh for up to 3 months. When ready to eat, I thaw them overnight in the fridge for the best texture and flavor.
Reheating
To enjoy caramelitas warm, I gently reheat them in a low-temperature oven (about 300°F) for 5 to 7 minutes or briefly microwave a single bar (around 15 seconds) until the chocolate softens. Avoid overheating to prevent the caramel from becoming too runny or the cookie layers drying out. With just a little warming, you’ll recapture that fresh-baked magic.
FAQs
Can I use different types of caramel for this recipe?
Definitely! While I recommend soft individually wrapped caramels for easy melting, you can try homemade caramel or caramel sauce, but be sure it’s thick enough to hold between layers without soaking through the base.
Is it possible to make this recipe nut-free?
Yes! The recipe as is contains no nuts, so it’s naturally nut-free. Just double-check your chocolate chips and caramels don’t contain any nut traces if allergies are a concern.
Can I make these bars ahead of time?
Absolutely! These bars actually taste better after chilling overnight as the flavors meld and the caramel sets perfectly. They make a fantastic make-ahead dessert for parties or busy days.
What can I substitute for heavy cream?
If you don’t have heavy cream, full-fat coconut milk is a great alternative that still creates a smooth caramel sauce with a subtle coconut flavor, perfect for a unique twist.
How do I prevent the caramel layer from leaking?
Ensuring the cookie base is partially baked before adding the caramel and chocolate layers helps the bars hold their shape. Also, chilling them fully before slicing helps the caramel set firmly and prevents leakage.
Conclusion
If you’re craving a dessert that’s both comforting and irresistibly delicious, I wholeheartedly encourage you to try this Caramelitas Recipe. It’s one of my all-time favorites because it perfectly balances chewy oats, silky caramel, and rich chocolate in a straightforward recipe that anyone can master. Once you make these bars, they’re guaranteed to become a beloved staple in your baking repertoire — just like they did in mine!