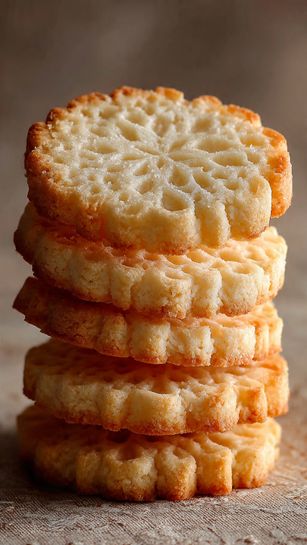
I’m always drawn to this recipe because it’s both straightforward and sophisticated. The dough comes together easily, and after a bit of chilling, I end up with beautifully golden, sugar-coated cookies that are light, crumbly, and full of buttery flavor. I enjoy serving them with tea, gifting them in cookie tins, or just keeping a jar of them handy for an afternoon snack. Their crisp texture and rich taste make them timeless and addicting.
Ingredients
(Here’s a tip: Check out the full list of ingredients and measurements in the recipe card below.)
½ cup butter, softened to room temperature
½ cup powdered sugar (sifted before measuring)
1 egg yolk, at room temperature
½ teaspoon vanilla extract
1 cup plus 2 tablespoons all-purpose or cake flour
¼ cup granulated sugar (for coating the dough before baking)
Directions
Make the Dough
I start by creaming the softened butter and powdered sugar together using a spatula until the mixture becomes pale and smooth.
I add the egg yolk and vanilla extract, mixing until fully combined.
Then I sift in the flour and gently mix it in until a soft dough forms. I make sure not to overwork it, which keeps the cookies light.
Refrigerate the Dough
I wrap the dough in plastic wrap and refrigerate it for about 20 minutes. This first chill helps firm the dough so it’s easier to shape.
Divide and Roll
Once chilled, I divide the dough into two equal portions and roll each into a log about 4 inches long and 1 inch in diameter.
I wrap each log tightly in plastic wrap and place them in the freezer for 45 minutes. This step makes slicing clean and easy.
Coat in Sugar, Slice, and Bake
I preheat the oven to 356°F (180°C), or 160°C if using a fan oven, and line a baking sheet with parchment or a silicone mat.
I unwrap the chilled dough logs and roll them in granulated sugar to coat the outside evenly.
I slice each log into ⅜-inch thick rounds and arrange them on the prepared baking sheet.
I bake the cookies for 15 to 18 minutes, just until they’re lightly golden on the edges.
Cool and Store
Once out of the oven, I leave the cookies on the tray for 5 minutes to firm up before transferring them to a cooling rack.
When completely cool, I store them in an airtight jar—they keep well for up to 5 days.
Sometimes I swap the vanilla with almond extract for a subtle nutty flavor.
For a citrus twist, I add a little lemon or orange zest into the dough.
If I want a more decorative cookie, I gently press the tops with a fork or cookie stamp before baking.
I’ve also dipped half of each baked cookie in melted chocolate for an elegant finish.
Storage/Reheating
I keep the cookies in an airtight jar at room temperature for up to 5 days. They maintain their crisp texture well. If the dough becomes too soft while shaping or slicing, I simply return it to the fridge or freezer for a few minutes to firm up—this helps keep the shape neat during baking.
FAQs
Can I freeze the dough?
Yes, I freeze the log-shaped dough before slicing. It holds up perfectly and can be baked directly from frozen—just add an extra minute or two to the baking time.
Why chill the dough twice?
The first chill makes the dough easier to handle and shape, while the second firms up the logs so I can slice clean, even cookies that hold their shape during baking.
Can I use salted butter?
Yes, I use salted butter if that’s what I have, but I skip adding any extra salt to the dough. If using unsalted butter, I add a pinch of salt to balance the flavor.
Can I make these with gluten-free flour?
I’ve had success using a 1:1 gluten-free baking flour blend. The cookies still come out crisp, but the texture may be slightly more delicate.
What’s the difference between cake flour and all-purpose in this recipe?
Cake flour gives a slightly lighter, more tender cookie. All-purpose works just as well and creates a crispier texture. I choose based on what I have on hand.
Conclusion
These French Butter Cookies are a simple pleasure that never goes out of style. Their crisp edges, buttery flavor, and melt-in-your-mouth texture make them one of my favorite treats to bake and share. Whether I’m enjoying them with tea, giving them as gifts, or just indulging in a quiet moment, these cookies always bring a little bit of classic elegance to the day.
These French butter cookies are rich, crisp, and melt in your mouth! Made with just five simple ingredients, they’re a classic treat that’s elegant, easy, and perfect with tea or coffee.
Ingredients
½ cup butter, softened to room temperature (see Note 1)
½ cup powdered sugar, sifted before measuring
1 egg yolk, room temperature
½ teaspoon vanilla extract
1 cup + 2 tablespoons all-purpose or cake flour (see Note 2)
¼ cup granulated sugar (for coating shaped dough before baking)
Instructions
1. Make the Dough:
In a mixing bowl, cream the softened butter and powdered sugar using a spatula until pale and light in texture.
Mix in the egg yolk and vanilla extract until fully combined.
Sift in the flour and mix until a soft dough forms.
2. Refrigerate the Dough (1st Chill):
Wrap the dough in plastic wrap and refrigerate for 20 minutes to firm it up.
3. Shape and Freeze the Dough (2nd Chill):
Divide dough into 2 pieces and roll each into a log approx. 4 inches (10 cm) long and 1 inch (3 cm) in diameter.
Wrap logs in plastic wrap and freeze for 45 minutes until firm.
4. Roll in Sugar, Slice, and Bake:
Preheat oven to 356°F (180°C) (or 160°C fan).
Line a baking sheet with parchment or a silicone baking mat.
Roll the frozen dough logs in ¼ cup granulated sugar to coat evenly.
Slice into ⅜-inch (1 cm) thick rounds and place on the baking sheet.
Bake for 15 to 18 minutes, until golden at the edges.
5. Cool and Store:
Let cookies cool on the baking sheet for 5 minutes before transferring to a cooling rack.
Once completely cool, store in an airtight container for up to 5 days.
Notes
Butter: Use unsalted or salted butter. If using unsalted, add a pinch of salt to the flour. Butter should be soft (out of the fridge for at least 1 hour) for easy mixing and to avoid overworking the dough.
Flour: Use cake flour or all-purpose/plain flour. Do not use self-rising flour, as it alters the texture.
Chilling is essential for the dough to stay firm and easy to work with. If dough becomes too soft, return it to the fridge or freezer for a few minutes.
These cookies are great for gifting or holiday cookie trays thanks to their shape, texture, and shelf-life.


