
Why You’ll Love This Recipe
I love how this cheesecake brings all the textures and flavors of a Twix bar into one no-fuss dessert. The graham cracker or cookie crust mimics the shortbread base, the caramel layer adds gooey richness, and the chocolate ganache gives it the perfect finish. Since it’s no-bake, I don’t even need to turn on the oven, which makes it especially great for warm days or when I want an easy make-ahead treat.
ingredients
(Here’s a tip: Check out the full list of ingredients and measurements in the recipe card below.)
graham cracker or shortbread cookie crumbs
unsalted butter (melted)
cream cheese (softened)
granulated sugar
vanilla extract
heavy cream
caramel sauce (store-bought or homemade)
chocolate chips or chopped chocolate
more heavy cream (for the ganache)
chopped Twix bars (for topping, optional)
directions
-
I mix the graham cracker or cookie crumbs with melted butter and press the mixture firmly into the bottom of a springform pan to form the crust. Then I chill it in the fridge while preparing the filling.
-
In a mixing bowl, I beat the cream cheese, sugar, and vanilla until smooth and fluffy.
-
In a separate bowl, I whip the heavy cream until stiff peaks form, then fold it gently into the cream cheese mixture.
-
I pour this filling over the chilled crust, smoothing the top, and then I spread a generous layer of caramel sauce over the cheesecake.
-
I return the cheesecake to the fridge for at least 4–6 hours, or overnight, to firm up.
-
Once it’s set, I make a simple ganache by heating heavy cream and pouring it over the chocolate chips. I let it sit, then stir until smooth.
-
I pour the ganache over the cheesecake and let it chill briefly until the top is set. If I want to go all-out, I sprinkle chopped Twix bars on top before serving.
Servings and timing
This cheesecake serves about 10–12 slices. It takes around 25 minutes to prepare, plus a minimum of 4–6 hours of chilling time, or overnight for best results.
Variations
Sometimes I use crushed Oreos instead of graham crackers for a chocolatey crust. If I want to skip store-bought candy, I leave off the Twix bar topping and just swirl some extra caramel and chocolate on top. For a salted twist, I use salted caramel and sprinkle a bit of sea salt over the ganache. A peanut butter version with peanut butter cups and peanut caramel sauce is another fun take I’ve tried.
storage/reheating
I store the cheesecake covered in the refrigerator for up to 5 days. To freeze, I wrap the cheesecake tightly and store it in the freezer for up to a month. I let it thaw in the fridge overnight before serving. I don’t reheat this dessert—it’s best served chilled.
FAQs
Can I make this cheesecake without a springform pan?
Yes, I’ve made it in a deep pie dish or an 8×8-inch baking dish. It’s harder to slice neatly, but it still tastes amazing.
Can I use whipped topping instead of whipping cream?
Yes, I sometimes use whipped topping (like Cool Whip) as a shortcut. It changes the texture slightly but still holds up well.
Is the caramel layer homemade or store-bought?
I use either. If I’m short on time, store-bought caramel sauce works great. When I want to go all out, I make my own caramel.
Can I make this cheesecake ahead of time?
Definitely. I often make it the night before serving. It sets perfectly and the flavors get even better after chilling overnight.
How do I prevent the ganache from getting too hard?
I use the right ratio of chocolate to cream and let it cool slightly before pouring. This keeps the topping glossy and soft, not hard or brittle.
Conclusion
This Homemade No-Bake Twix Cheesecake is everything I want in a dessert: rich, creamy, and full of nostalgic candy bar flavor. It’s easy to assemble, impressive to serve, and perfect for anyone who loves a good layered treat. Whether I’m making it for a special occasion or just to satisfy a sweet craving, it always hits the mark.
Print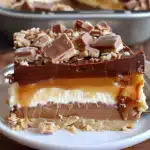
Homemade No-Bake Twix Cheesecake
- Total Time: ~6 hours 25 minutes
- Yield: 10–12 slices
- Diet: Vegetarian
Description
A decadent no-bake dessert with a buttery crust, creamy cheesecake filling, caramel layer, chocolate ganache, and chopped Twix on top.
Ingredients
Crust:
1½ cups graham cracker or shortbread cookie crumbs
½ cup unsalted butter, melted
Cheesecake Filling:
16 oz cream cheese, softened
½ cup granulated sugar
1 teaspoon vanilla extract
1 cup heavy cream (whipped to stiff peaks)
Caramel Layer:
¾ cup caramel sauce (store-bought or homemade)
Chocolate Ganache:
½ cup chocolate chips or chopped chocolate
½ cup heavy cream
Optional Topping:
Chopped Twix bars
Instructions
Combine cookie crumbs and melted butter. Press firmly into the bottom of a springform pan. Chill while preparing the filling.
In a mixing bowl, beat the cream cheese, sugar, and vanilla until smooth.
Whip the heavy cream to stiff peaks and gently fold into the cream cheese mixture.
Pour the filling over the chilled crust and smooth the top.
Spread a generous layer of caramel sauce over the filling.
Refrigerate for at least 4–6 hours, or overnight.
For the ganache, heat the heavy cream until just simmering and pour over chocolate. Let sit 1–2 minutes, then stir until smooth.
Pour ganache over the set cheesecake and chill for 15–30 minutes.
Before serving, top with chopped Twix bars if desired.
Notes
Use Oreos for a chocolate crust variation.
For a salted twist, use salted caramel and finish with a pinch of sea salt.
Whipped topping (like Cool Whip) can replace whipped cream in a pinch.
Cheesecake sets best overnight.
Slice with a warm knife for clean edges.
- Prep Time: 25 minutes
- Cook Time: 0 minutes
- Category: Dessert
- Method: No-Bake
- Cuisine: American


