
Why You’ll Love This Recipe
I like this method because it’s incredibly simple and almost foolproof. I don’t need any special equipment, and the slow, low-temperature drying keeps the oranges vibrant instead of overly browned. I also appreciate how versatile the finished slices are, whether I’m making a garland, decorating a table, or adding detail to gifts.
 Ingredients
(Here’s a tip: Check out the full list of ingredients and measurements in the recipe card below.)
-
Fresh oranges (navel oranges work well)
-
Parchment paper (if not using a rack)
Directions
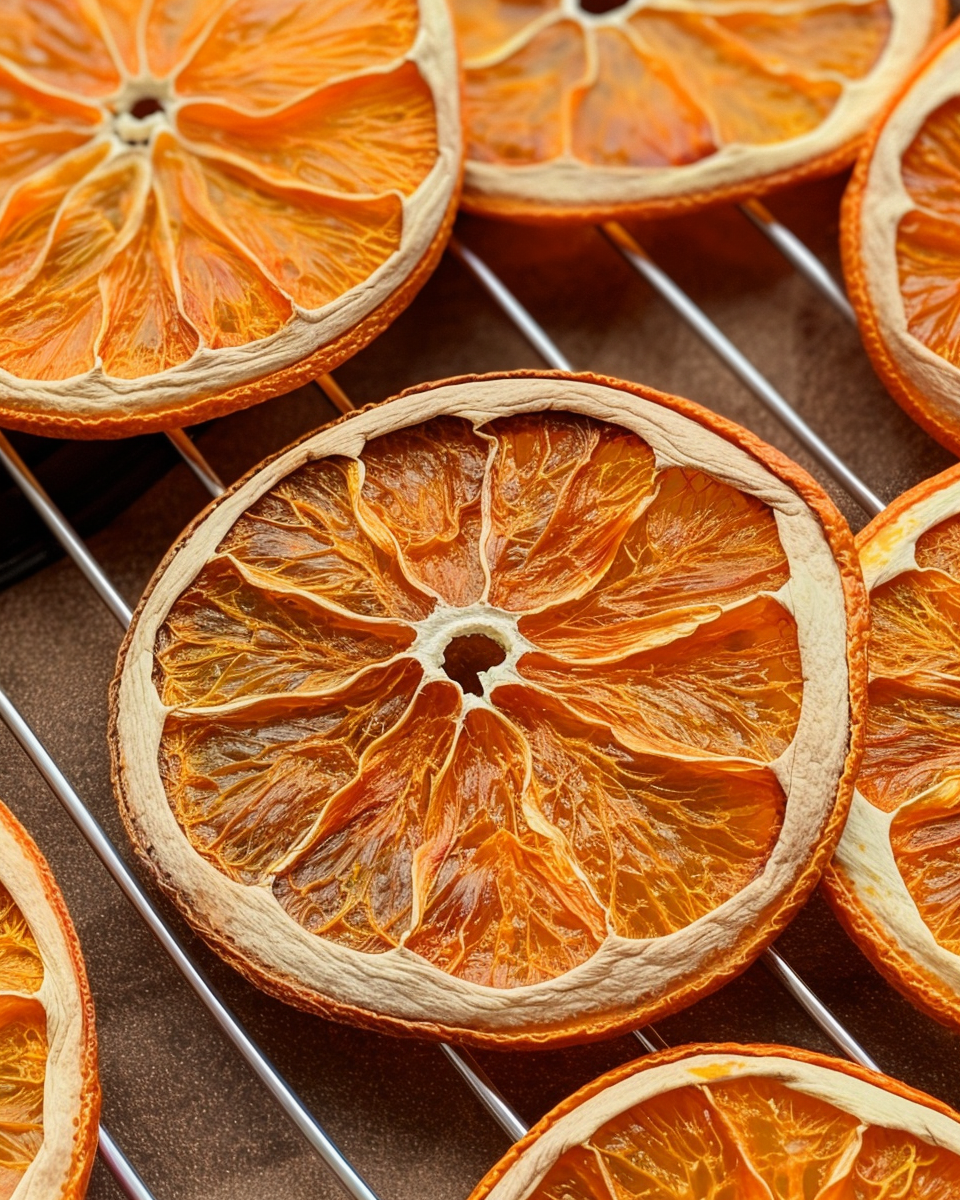
I start by preheating my oven to 200°F. While the oven warms up, I slice the oranges into thin rounds, about 1/8-inch thick. I try to keep the slices as even as possible so they dry at the same rate.
Next, I arrange the orange slices in a single layer on an oven-safe cooling rack or a cookie sheet lined with parchment paper. I make sure none of the slices overlap so air can circulate properly.
I place the tray in the oven and let the oranges dry slowly for 5 to 6 hours. About halfway through, I flip the slices to help them dry evenly. I keep an eye on the color, but I avoid raising the temperature because the low heat helps preserve that gorgeous orange tone.
Once the slices feel mostly dry with just a slight tackiness in the center, I remove them from the oven and let them cool completely.
Servings and timing
I usually use about 2 oranges, which gives me roughly 20 to 25 dried slices. This amount works well for a small garland or several decorative projects.
Prep time is about 10 minutes, and drying time takes 5 to 6 hours. Cooling takes another 20 to 30 minutes.
Variations
I sometimes experiment with different citrus like blood oranges, lemons, or limes for a more varied look. I’ve also tried sprinkling a little cinnamon on the slices before drying when I want a subtle seasonal scent. Cutting the slices slightly thicker gives a more rustic feel, while thinner slices look more delicate.
storage/reheating
I store my dried orange slices in an airtight container at room temperature. As long as they are fully dry, they keep well for several months. I avoid humid areas, since moisture can cause them to soften or mold. There’s no reheating needed, as these are meant purely for decoration.
FAQs
Can I use a higher oven temperature to speed things up?
I’ve tried higher temperatures, but I find they cause browning and dull the color, so I prefer low and slow for the best results.
Do the slices need to be completely dry?
I like them very dry with just a tiny bit of tackiness in the center, especially if I’m using them for décor rather than eating.
Can I make these without a cooling rack?
I often use a parchment-lined baking sheet instead, and it works just fine with occasional flipping.
How do I know when the slices are done?
I check that they feel firm and mostly dry to the touch, with no visible moisture pooling on the surface.
Are dried orange slices edible?
They are technically edible, but I mostly make them for decoration, so I don’t plan on eating them.
Conclusion
I always enjoy making dried orange slices because the process is simple and the results feel elegant and festive. This method keeps the color bright and the texture just right, making them perfect for holiday decorating. Every time I use them, they add that extra touch that makes my seasonal décor feel complete.

How to Make Gorgeous Dried Orange Slices
5 Stars 4 Stars 3 Stars 2 Stars 1 Star
No reviews
- Author: Mia
- Total Time: 5 hours 10 minutes – 6 hours 10 minutes
- Yield: 20–25 dried orange slices
- Diet: Vegan
Description
Learn how to make gorgeous dried orange slices with a simple low-heat oven method that keeps the color vibrant and edges perfectly crisp. These dried orange slices are ideal for Christmas decor, garlands, gift wrapping, and festive styling.
Ingredients
2 fresh oranges (navel oranges work beautifully)
Instructions
Preheat oven to 200°F (95°C).
Slice oranges into even ⅛-inch thick rounds using a sharp knife.
Arrange slices in a single layer on an oven-safe cooling rack set over a baking sheet
or directly on a parchment-lined cookie sheet.
Bake for 5–6 hours, flipping slices once halfway through.
Continue drying until slices are fully dehydrated with minimal tackiness and no browning.
Remove from oven and allow to cool completely before using or storing.
Notes
Using a lower oven temperature helps maintain the bright orange color and prevents burnt edges.
A cooling rack improves airflow and creates more evenly dried slices, but it’s optional.
Expect about 20–25 slices from 2 oranges—perfect for roughly a 9-foot garland.
Slight tackiness in the center is normal and ideal for decorative use.
- Prep Time: 10 minutes
- Cook Time: 5–6 hours
- Category: Holiday Decor / DIY
- Method: Oven-Dried
- Cuisine: Seasonal / Holiday

