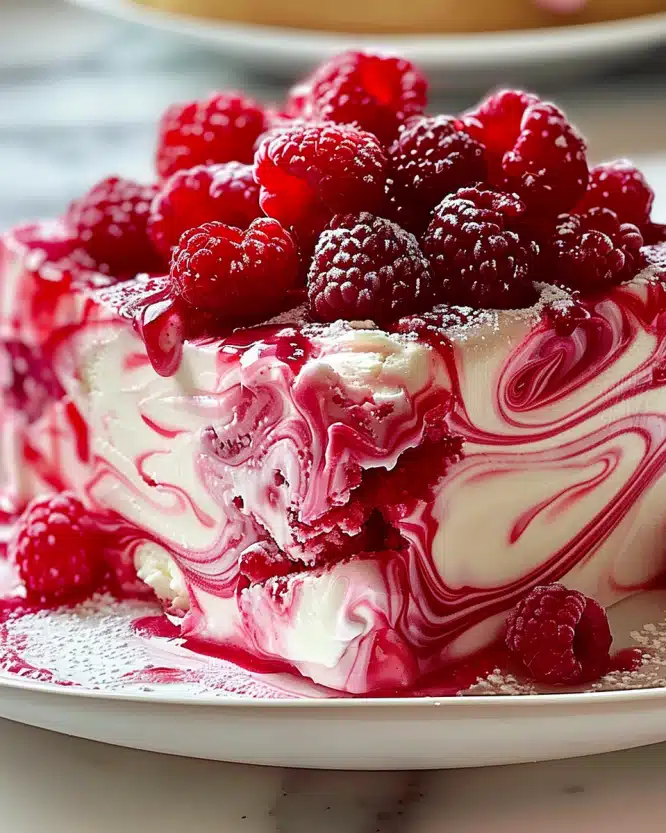
I am absolutely in love with this Instant Pot Chocolate Cheesecake with Strawberries and Chocolate Drizzle Recipe—it’s one of those desserts that feels like a special treat but is surprisingly easy to pull off. The creamy chocolate filling paired with a crunchy Oreo crust, finished with fresh strawberries and a luscious chocolate drizzle, makes every bite pure indulgence. I find that using the Instant Pot not only speeds up the cooking process but also creates the creamiest, most perfectly textured cheesecake that I can serve any time I want to impress friends or family. Trust me, this recipe will quickly become a favorite in your dessert rotation.
Why You’ll Love This Instant Pot Chocolate Cheesecake with Strawberries and Chocolate Drizzle Recipe
What really excites me about this cheesecake is the rich, velvety chocolate flavor that melts in your mouth while still offering that delightful contrast from the crunchy Oreo crust. The combination of semi-sweet chocolate chips and cocoa powder gives it a deep chocolate intensity, and the sweet strawberries on top add a refreshing burst that balances the richness perfectly. Every time I take a bite, I’m reminded how this dessert hits all the right notes—creamy, chocolatey, and just the right amount of sweetness.
Another reason I keep coming back to this recipe is because it’s incredibly straightforward. The Instant Pot takes out all the guesswork for baking cheesecake to perfection, which can sometimes be tricky in a conventional oven. Whether I’m preparing for a casual weeknight indulgence, a celebratory dinner, or a special occasion, this recipe feels dependable and impressive. It stands out to me because it combines the convenience of the Instant Pot with a classic, elegant dessert that everyone loves.
Ingredients You’ll Need

These ingredients are simple, pantry-friendly, and essential for bringing that chocolate cheesecake dream to life. Each one plays a big role—whether it’s delivering creamy texture, a buttery crust, or that rich chocolate flavor that makes this dessert genuinely irresistible.
- 20 Oreos: I use classic Oreos for the crust to add crunch and chocolate flavor with no extra effort.
- 3 tbsp butter, melted: This helps bind the Oreo crumbs into a firm, buttery crust that holds perfectly.
- 16 oz cream cheese, softened: The star of the show, giving the cheesecake its luxurious and creamy texture.
- 1/2 cup sugar: Just enough sweetness to balance the chocolate without overpowering it.
- 1 tsp vanilla extract: Adds warmth and depth to the cheesecake filling.
- 1 cup semi-sweet chocolate chips: For that rich, melty chocolate goodness mixed right into the batter.
- 1/2 cup heavy cream: Makes the chocolate filling extra smooth and creamy.
- 1 tbsp cocoa powder: A chocolate boost that intensifies the flavor and color.
- 2 eggs: These give structure and help the cheesecake set perfectly during cooking.
- Chopped strawberries: For topping the cheesecake with a fresh, fruity contrast.
- Melted chocolate: Perfect for drizzling on top to make it look and taste decadent.
- Whipped cream: An optional but delightful topping that adds lightness to each bite.
- Caramel sauce: Another optional finishing touch for those who love a sweet, buttery complement.
Directions
Step 1: Spray the bottom and sides of a 7-inch springform pan with non-stick spray to ensure easy removal later.
Step 2: Pour 1 1/2 cups of water into the bottom of your Instant Pot’s inner pot and place the metal trivet inside.
Step 3: Create an aluminum foil sling by folding a long piece of foil lengthwise three times. This sling will help you safely lift the springform pan out later.
Step 4: Place the Oreos into a food processor and pulse until they become fine crumbs. Pour in the melted butter and pulse again until combined, scraping down the sides if necessary.
Step 5: Press the Oreo crumb mixture firmly into the bottom of the prepared springform pan using a fork or the back of a spoon. Place the crust in the freezer to set while you prepare the filling.
Step 6: Rinse out your food processor, then add the softened cream cheese, sugar, and vanilla extract. Pulse until smooth and creamy.
Step 7: Melt the chocolate chips with the heavy cream in a microwave-safe bowl—heat in short bursts, stirring in between until completely melted and smooth.
Step 8: Pour the melted chocolate mixture into the cream cheese mixture and pulse to combine.
Step 9: Add the cocoa powder and pulse again until fully incorporated.
Step 10: Add the eggs last and pulse just until combined—you want to avoid overmixing to keep the texture light and creamy.
Step 11: Remove the crust from the freezer and pour the cheesecake filling evenly over it in the pan.
Step 12: Cover the pan with a paper towel and then a sheet of foil, making sure to seal around the edges securely.
Step 13: Place the springform pan onto the aluminum foil sling, then carefully lower it onto the trivet inside the Instant Pot. Fold the edges of the sling over the top of the pan.
Step 14: Secure the Instant Pot lid and set the valve to the sealing position. Cook on manual, high pressure for 40 minutes.
Step 15: Let the pressure release naturally for 20 minutes, then carefully release any remaining pressure and remove the lid.
Step 16: Use the sling to lift the pan out of the pot and let it rest for 5 minutes before removing the foil and paper towel.
Step 17: Allow the cheesecake to cool at room temperature for about an hour, then refrigerate for at least 4 hours before serving.
Step 18: Garnish with chopped strawberries, drizzle melted chocolate over the top, and add whipped cream or caramel sauce if you like. Serve chilled and enjoy every bite!
Servings and Timing
This recipe makes about 8 generous servings—perfect for sharing with family or a small group of friends. The prep time is around 20 minutes since the Instant Pot handles the cooking. The cook time is 40 minutes under pressure plus 20 minutes for natural release, making it about 1 hour overall. Add 1 hour of cooling at room temperature and at least 4 hours chilling time in the fridge before serving, so plan ahead for the best results. The cheesecake is well worth the wait, and the timing means you can prep it ahead for an event or just as a special weekend treat.
How to Serve This Instant Pot Chocolate Cheesecake with Strawberries and Chocolate Drizzle Recipe

When serving this cheesecake, I love how versatile it is. Fresh chopped strawberries on top add that lovely pop of color and a fresh fruity zing. You can’t go wrong with an elegant drizzle of melted chocolate to make it look restaurant-quality. For a bit of fun, I sometimes add dollops of whipped cream or a light caramel sauce swirl. It always feels like a special occasion when this dessert hits the table.
If you want to go a step further, I recommend pairing this chocolate cheesecake with a dollop of lightly sweetened whipped cream to balance the richness. A dusting of cocoa or some crushed Oreos sprinkled on top can make it look so inviting. For drinks, a glass of rich red wine such as a Merlot or a bold cabernet supports the chocolate beautifully. If you prefer non-alcoholic options, a robust cold brew coffee or a creamy hot chocolate is dreamy alongside this dessert. I often serve this chilled straight from the fridge, but I find letting it sit at room temperature for 10-15 minutes unlocks the creamiest texture and fullest flavor.
This cheesecake fits any occasion—from casual family dinners where you want a show-stopping finale, to holiday gatherings when desserts need to shine. I like to slice it into 8 portions, so everyone gets a satisfying piece without feeling overwhelmed. It’s rich enough that smaller slices work too if you want to keep portions lighter or offer a dessert sampler.
Variations
I love experimenting with ways to put a new spin on this Instant Pot Chocolate Cheesecake with Strawberries and Chocolate Drizzle Recipe. For example, you can swap the Oreo crust with gluten-free chocolate cookies if you’re accommodating dietary needs. Using dairy-free cream cheese and dairy-free chocolate chips can make it vegan-friendly—just be sure to substitute eggs with flax eggs or a plant-based egg replacer. These tweaks still maintain the creamy texture, and I find the chocolate flavor remains true to form.
If you’re craving a twist, adding a teaspoon of espresso powder to the cheesecake filling intensifies the chocolate flavor beautifully—it’s my little secret for a mocha touch. You could also swap strawberries for raspberries or blueberries for a seasonal change, or even add a swirl of peanut butter or caramel into the batter before cooking to play with flavors and textures. If you prefer baking, this cheesecake can be adapted for the oven in a water bath at 325°F for about 50-60 minutes, but nothing beats the ease and texture that the Instant Pot provides.
Storage and Reheating
Storing Leftovers
I always store leftovers in an airtight container or keep the cheesecake tightly wrapped with plastic wrap and foil to prevent it from drying out or absorbing fridge odors. It stays fresh in the refrigerator for 4 to 5 days, which is plenty of time to enjoy second and third helpings. Keeping it chilled preserves that perfect creamy texture I love.
Freezing
This cheesecake freezes very well. I slice it into individual portions and wrap each piece tightly with plastic wrap followed by a layer of foil or store them in freezer-safe containers. When wrapped well, it keeps in the freezer for up to 2 months. To enjoy, thaw slices overnight in the fridge for best texture and flavor.
Reheating
Since this cheesecake is best served chilled, I don’t recommend heating it. However, I like to let refrigerated slices sit at room temperature for 10-15 minutes before eating, which enhances the creamy texture and amplifies the chocolate flavor. Avoid microwaving because that can cause the texture to become grainy or runny—the beauty is really in the cool, velvety experience.
FAQs
Can I use a different cookie for the crust?
Absolutely! While Oreos provide a great chocolatey crunch, you can substitute with graham crackers, chocolate wafers, or gluten-free cookies depending on your preferences and dietary needs. Just be sure to crush them finely and combine with melted butter so the crust holds together nicely.
What if I don’t have a 7-inch springform pan?
If you only have an 8-inch pan, that works too but keep in mind your cheesecake might be slightly thinner and will require a shorter cooking time—about 35 minutes under pressure instead of 40. Just keep an eye on texture and adjust accordingly.
Can I make this recipe without a food processor?
You can, though a food processor speeds things up and helps achieve the smoothest filling. For the crust, place the Oreos in a sealed plastic bag and crush with a rolling pin. For the filling, beat the cream cheese, sugar, and vanilla with a hand mixer until smooth before folding in melted chocolate and eggs carefully.
How do I know when the cheesecake is done in the Instant Pot?
The cooking time in the Instant Pot is pretty precise—40 minutes on high pressure with a natural release ensures it’s set but still creamy. The edges should be firm while the center might have a slight jiggle, which is perfect as it continues to set while cooling and chilling.
Can I add toppings before cooking?
I don’t recommend it because toppings like strawberries and chocolate drizzle can get soggy or melt. It’s best to add fresh strawberries, melted chocolate, whipped cream, or caramel sauce right before serving to keep things fresh and visually appealing.
Conclusion
I seriously can’t recommend this Instant Pot Chocolate Cheesecake with Strawberries and Chocolate Drizzle Recipe enough. It’s one of those recipes I make when I want to wow guests or simply treat myself to something decadent and satisfying with minimal fuss. The creamy chocolate flavor with the Oreo crust and fresh strawberries on top is a combination I never get tired of. Give it a try—you might just find yourself making it over and over again!