I’m thrilled to share with you my take on the iconic Magnolia Bakery Banana Pudding Recipe, a dessert that has quickly become a beloved classic in my kitchen. This creamy, dreamy treat balances the sweetness of rich pudding, fresh bananas, and crunchy Nilla Wafers in a way that simply melts my heart every single time. It’s my go-to comfort dessert, perfect for celebrations or any day I want to feel a little extra special. The texture and flavor are pure magic, and I can’t wait for you to experience it too.
Why You’ll Love This Magnolia Bakery Banana Pudding Recipe
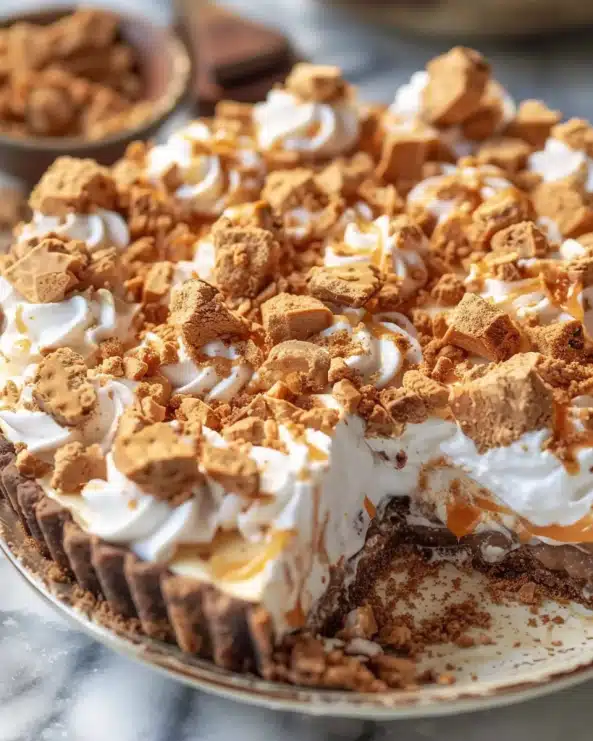
For me, the heart of this recipe is its heavenly flavor combination. The sweet, silky pudding mingled with the subtle vanilla whipped cream creates a luscious base that plays perfectly with the fresh banana slices’ natural sweetness. Then the crispy vanilla wafers give each bite an irresistible crunch that breaks through the creaminess. This balance of textures and flavors is what makes this recipe truly stand out in my book.
Another reason I adore this Magnolia Bakery Banana Pudding Recipe is how straightforward it is to make. I especially appreciate that it requires no complicated cooking techniques, just some mixing, folding, and layering. The pudding needs to chill for a few hours, which means it’s wonderful for preparing in advance for parties or family gatherings. Plus, it always impresses guests with its beautiful presentation and classic Southern charm. Trust me, it’s a crowd-pleaser every time.
Ingredients You’ll Need

This recipe calls for simple yet essential ingredients that each play a vital role in building the pudding’s distinct taste and texture. From creamy dairy to the crisp vanilla wafers and ripe bananas, every component is crucial for recreating that authentic Magnolia Bakery experience.
- Sweetened condensed milk: Adds rich sweetness and creamy depth to the pudding base.
- Very cold milk: Helps the instant vanilla pudding mix to set properly and stay smooth.
- Very cold water: Keeps the mixture light and balances the dairy richness.
- Instant vanilla pudding mix: The foundation that gives you that silky texture and classic flavor.
- Nilla Wafers (11-12 oz box): Provides the iconic crunch essential for layering and garnishing.
- Heavy whipping cream: Whipped to stiff peaks, this makes the pudding fluffy and light.
- Clear vanilla flavoring: Enriches the whipped cream with pure, sweet vanilla notes.
- Bananas (5, just barely ripe): Adds fresh natural sweetness and soft texture between layers.
Directions
Step 1: Start by combining the sweetened condensed milk, very cold milk, and cold water in a mixing bowl. Use a hand-held or stand mixer on low to medium speed and mix for about 1-2 minutes until everything is well incorporated.
Step 2: Next, add the instant vanilla pudding mix to the liquid mixture and beat on medium speed for 2 minutes. You’ll notice the pudding starting to thicken, which means you’re on the right track.
Step 3: Cover this pudding mixture and pop it into the fridge for at least 4 hours, or overnight if you can. This chilling step is key to letting the pudding fully set and develop its creamy texture.
Step 4: While the pudding chills, whip the heavy cream together with the clear vanilla flavoring. Beat until stiff peaks form. I find this step fun because you can tell when the cream is just right—it holds its shape perfectly when you lift the beaters.
Step 5: Gently fold the whipped cream into the fully set pudding mixture. Use spatula motions to combine until the mixture is uniform in color and texture without any streaks. The folding keeps everything airy and light.
Step 6: For assembling, grab a large serving bowl, a trifle dish, or a compote bowl. Start each layer by lining the bottom with about one-third of the Nilla Wafers, roughly 30 wafers. This creates a crunchy base.
Step 7: Evenly spread 1 ½ cups of sliced bananas on top of the wafers. I always make sure the banana slices are just barely ripe so they’re sweet but hold their shape nicely.
Step 8: Spoon one-third of the pudding mixture over the bananas and wafers. Smooth it out gently to create an even layer.
Step 9: Repeat these layers two more times—wafers, bananas, pudding—until you have three beautiful layers stacked high.
Step 10: Take the reserved 5 to 6 Nilla Wafers and crush them roughly. Sprinkle these crushed wafers along with any leftover crumbs from the box over the top of the pudding for a gorgeous finishing touch.
Step 11: Cover the dish tightly and refrigerate until ready to serve. Chilling helps those flavors marry perfectly and the wafers soften just slightly without losing all crunch.
Servings and Timing
This recipe yields approximately 16 generous servings, making it ideal for a crowd or family gatherings. The prep time is about 15 minutes, but since the pudding must chill for at least 4 hours to fully set, the total time comes to about 4 hours and 15 minutes. There is no traditional cook time since it’s a no-bake dessert, but the resting time in the fridge is essential for the best texture and flavor.
How to Serve This Magnolia Bakery Banana Pudding Recipe

When it comes to serving, I love to keep things classic. You can scoop generous portions into individual bowls or use pretty mini trifle dishes for a decorative presentation that feels special. Serving it chilled is ideal since it highlights the creamy texture and keeps the bananas fresh.
This banana pudding pairs beautifully with fresh berries or a light dusting of cinnamon for a little extra flavor complexity. For a party, I like to set out a tray with thin slices of fresh bananas and a small bowl of crushed wafers so guests can customize their own portions. Garnishing with a sprig of mint adds a pop of color and a fresh note.
For drinks, a chilled glass of Moscato or a sweet Riesling complements the pudding’s sweetness beautifully. If you prefer non-alcoholic beverages, iced tea with lemon or a classic milkshake are perfect companions. I often find this dessert makes for an unforgettable finish to family dinners, summer barbecues, and holiday gatherings alike.
Variations
I love experimenting with this Magnolia Bakery Banana Pudding Recipe to suit different tastes and dietary needs. For example, if you want to make it gluten-free, look for gluten-free vanilla wafers or substitute with crushed gluten-free cookies. The texture remains wonderfully satisfying even with this swap.
If you’re aiming for a vegan version, you can replace the dairy ingredients with coconut milk or almond milk pudding mixes, and swap the whipped cream for a coconut cream whipped topping. I’ve found that while the flavor changes slightly, it still delivers that creamy, indulgent experience.
Flavor-wise, I sometimes add a pinch of cinnamon or a splash of bourbon into the pudding layer for a subtle twist. You could also mix in chopped toasted pecans for extra texture. Another fun method is layering the pudding in individual mason jars for easy serving and portion control.
Storage and Reheating
Storing Leftovers
Leftover banana pudding is best stored in an airtight container or tightly covered in the refrigerator. A glass or plastic container with a secure lid works well to keep the dessert fresh and prevent it from absorbing fridge odors. The pudding typically stays good for up to 3 days, but I recommend enjoying it within 24-48 hours for the best taste and texture since bananas can brown and wafers may soften too much over time.
Freezing
Freezing this banana pudding is generally not recommended because the texture of the bananas and whipped cream can change once thawed, often becoming mushy or watery. If you do want to freeze it, I suggest freezing the pudding mixture alone (without bananas or wafers) in an airtight container for up to 1 month. Thaw it overnight in the fridge before assembling with fresh banana slices and wafers.
Reheating
This dessert is best served chilled and is not meant to be heated. Reheating will cause the whipped cream to break down and the pudding to lose its creamy texture. Instead, let it come to just above fridge temperature by sitting out for 10-15 minutes before serving if you prefer it less cold.
FAQs
Can I make the pudding layers ahead of time?
Absolutely! The pudding mixture actually needs to chill for at least 4 hours or overnight for the best texture, so preparing the base a day ahead saves you time on serving day and lets the flavors develop beautifully.
What kind of bananas work best in this recipe?
I recommend using bananas that are just barely ripe—yellow with little or no brown spots. They’re sweet but still firm enough to hold their shape through layering and serving without turning mushy or overly sweet.
Can I use fresh whipped cream instead of heavy whipping cream?
Heavy whipping cream is ideal because it whips up thick and stable, which helps the pudding stay light but structured. Fresh whipped cream bought from the store tends to be softer and might not hold the layers as well.
Is there a way to make this pudding less sweet?
If you prefer a less sweet dessert, you can reduce the amount of sweetened condensed milk slightly or choose a low-sugar instant pudding mix. Adding a pinch of sea salt when mixing can also help balance the sweetness without compromising flavor.
Can I assemble this pudding in individual servings?
Definitely! I love using small trifle bowls or mason jars for single servings—it looks charming and is perfect for parties or gifting. Just layer the ingredients as usual, and chill until serving.
Conclusion
Making this Magnolia Bakery Banana Pudding Recipe has brought me so much joy, and I honestly believe it can bring some to your table as well. Its perfect balance of creamy, crunchy, and fruity layers make it a dessert you’ll want to come back to again and again. I encourage you to give it a try, share it with your loved ones, and savor every delightful bite. Trust me, this recipe will become one of your favorites just like it did for me!