“`html
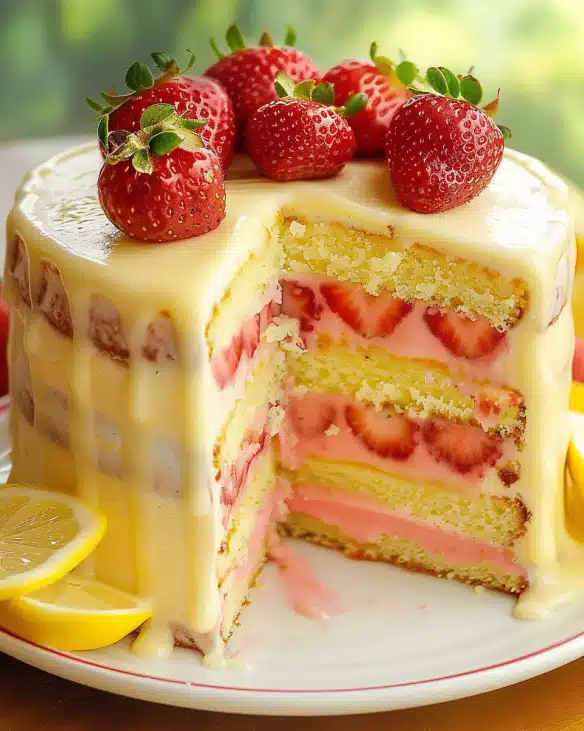
I absolutely adore this Matcha Strawberry Layer Cake Recipe because it combines some of my favorite flavors into one stunning, delightful dessert. The earthy, slightly grassy notes of vibrant green matcha perfectly balance the sweet, juicy strawberries and luscious whipped cream layers, making each bite feel fresh and deliciously indulgent. It’s a recipe I’ve turned to time and time again, whether for celebrations or treating myself on a quiet afternoon, and I can’t wait to share it with you!
Why You’ll Love This Matcha Strawberry Layer Cake Recipe
From the moment I mix the smooth, delicate matcha cake batter to the final touch of fresh strawberries pressed against whipped cream, this recipe captivates me with its unique flavor profile. The matcha adds a subtle earthiness that brings a refined twist to the classic strawberry layer cake, while the cream cheese whipped cream lends just the right amount of tang and richness. Every forkful balances lightness with decadence, and I love how it feels both exotic and familiar.
What really makes this cake stand out for me is how approachable it is to make, despite looking so elegant. I remember my first time baking it; the steps are straightforward yet rewarding, and the fresh strawberries provide a natural vibrancy that doesn’t need any fancy decorations. It’s perfect for birthdays, afternoon tea, or even a special weekend treat. Plus, knowing it’s simple enough to tackle without stress gives me confidence to whip it up whenever the craving hits.
Ingredients You’ll Need

The ingredients for this cake are wonderfully simple but thoughtfully balanced to create the perfect texture, flavor, and color. Each one plays a crucial role in building the light, moist matcha sponge and the fresh, creamy layers that make this cake so irresistible.
- Whole milk (80 g): Adds moisture and richness to the batter, helping create a tender crumb.
- Unsalted butter (50 g): Melted for smoothness and a slightly creamy texture that complements the matcha.
- Vanilla (1 teaspoon): Enhances the natural flavors without overpowering the matcha.
- Sea salt (1/2 teaspoon): Balances sweetness and heightens the matcha’s earthiness.
- Cake flour (70 g): Provides a light, soft crumb essential for this delicate layer cake.
- Matcha powder (5 g): The star ingredient that delivers the cake’s signature green color and unique flavor.
- Egg yolks (4 large): Add richness and help bind the cake with a beautiful smoothness.
- Egg whites (4 large): Whipped to fluffy peaks to lighten the whole batter and give it an airy texture.
- Cream of tartar (1/4 teaspoon) or white vinegar (1/2 teaspoon): Stabilizes the whipped egg whites for maximum volume.
- Caster sugar (85 g): Sweetens the cake delicately and stabilizes the meringue structure.
- Strawberries (340-450 g): Fresh, juicy, and sweet – these brighten the cake with natural freshness.
- Cream cheese (4 tablespoons): Adds a slight tang and richness to the whipped cream, giving it depth.
- Confectioners sugar (4 tablespoons): Sweetens and smooths the cream cheese mixture beautifully.
- Heavy whipping cream (473 g): Whipped to luscious peaks, it creates the light, creamy layers that hold the cake together.
Directions
Step 1: Prepare your pan by cutting a piece of parchment paper to fit the bottom of a 13”x9” quarter sheet pan and line it evenly. This ensures your cake will release easily after baking.
Step 2: Preheat your oven to 325°F (160°C). I find this temperature perfect for an even rise and gentle baking without drying the cake out.
Step 3: In a microwave-safe bowl, combine the milk and unsalted butter. Heat until melted, then stir in the vanilla extract and sea salt. This warm mixture makes folding the dry ingredients into the wet much smoother.
Step 4: Sift the cake flour and matcha powder into the milk mixture to avoid lumps, then gently fold with a spatula until you get a smooth, vibrant green batter without overmixing.
Step 5: Add in the egg yolks and mix until fully combined, creating a luxurious batter base.
Step 6: In a clean mixing bowl, add the egg whites and cream of tartar (or white vinegar). Beat using a stand or hand mixer at medium speed until frothy, then gradually add the caster sugar while continuing to whip until stiff, glossy peaks form. This meringue stage is crucial for the cake’s airy texture.
Step 7: Carefully fold a quarter of the meringue into the yolk mixture to lighten it. Then gently fold that combined mixture back into the rest of the egg whites. I always take my time here to avoid deflating the batter, aiming for a smooth but airy consistency.
Step 8: Pour the batter into the lined sheet pan and drop it twice from about 5 inches above your countertop to release any large air bubbles, which helps ensure an even crumb.
Step 9: Bake for 15 to 20 minutes at 325°F (160°C). You’ll know the cake is done when it springs back gently after pressing the surface.
Step 10: After baking, run a sharp paring knife around the edges to loosen the cake. Place a cooling rack over the pan, use oven mitts or towels, and swiftly flip the cake onto the rack. Let it cool completely before moving on to decorating.
Step 11: Once cooled, flip the cake back onto the pan, then slice it horizontally into two equal layers. Trim about 1/4 inch off all four sides to create straight edges for clean layers.
Step 12: Prepare the strawberries by selecting 8-10 medium ones for the cake edges, slicing these in half. Slice the remaining strawberries into three even pieces each for the interior filling.
Step 13: For the cream, blend cream cheese and confectioners sugar until smooth, then whip in heavy cream until you get firm peaks. Stop whipping right at this point to avoid turning it into butter.
Step 14: On the bottom cake layer, spread a generous but thin even layer of the whipped cream using an offset spatula, then arrange the strawberry halves stem-side down around the edge, cut side facing out to form a “strawberry wall.”
Step 15: Fill the center with strawberry slices, then cover them carefully with another layer of whipped cream to secure and hydrate the fruit.
Step 16: Place the second layer of cake on top, aligning the edges, then spread another layer of cream evenly over the top and sides, smoothing with your spatula.
Step 17: Fill a piping bag with the remaining cream to decorate the top and sides as you like – I love simple rosettes or dots for a polished finish.
Step 18: You can serve your cake right away or refrigerate it for 2 to 3 days. When slicing, I recommend using a serrated or sharp paring knife for clean cuts without crushing the layers.
Servings and Timing
This Matcha Strawberry Layer Cake Recipe makes approximately 8 generous servings, perfect for sharing with friends or family. It takes about 30 minutes to prep and assemble the batter and strawberries, 15–20 minutes to bake, and an additional 20 minutes to cool completely before decorating. Plan for at least 1 hour and 50 minutes total to allow the cake to cool fully and the cream to set beautifully. The resting time in the fridge after decorating helps the flavors meld and the cake become easier to slice.
How to Serve This Matcha Strawberry Layer Cake Recipe

I love serving this cake chilled or at room temperature, which really lets the vibrant flavors shine and keeps the whipped cream light and fluffy. For a lovely presentation, slice it into neat wedges and plate with a few fresh strawberries on the side to echo the theme. If you want to elevate the look further, fresh mint leaves or edible flower petals add a beautiful, fresh pop of color.
Pairing this cake with a light beverage is key. I often enjoy it with a cup of hot green tea to complement the matcha or a sparkling rosé for a celebratory touch. For a non-alcoholic option, a chilled citrus-infused sparkling water balances the cake’s sweetness perfectly. This dessert is wonderful for family dinners, afternoon tea parties, or special occasions like birthdays or holidays when you want to impress without too much fuss.
When it comes to portion, I find slightly smaller slices work best because the cake is rich yet light. Serving it on a small dessert plate with a delicate fork really adds to the charm and enjoyment. Plus, leftovers (if there are any!) stay wonderfully fresh and just as flavorful after a day or two in the fridge.
Variations
Over time, I’ve experimented with several ways to make this Matcha Strawberry Layer Cake Recipe uniquely mine. For example, swapping the cake flour for a gluten-free blend worked surprisingly well for my gluten-sensitive friends, preserving that soft texture. If you prefer vegan options, replacing the eggs with aquafaba and using coconut cream can yield a delicious, cruelty-free alternative, though keep in mind the flavor will shift slightly.
Flavor-wise, I’ve tried switching the strawberries for raspberries or even diced mango, which pairs beautifully with the matcha’s earthiness and adds a fresh twist. For a richer cake, a light drizzle of white chocolate ganache on the top layer is heavenly. Alternatively, you can bake this cake in round pans instead of a sheet pan for a classic layered cake shape, just adjust baking time accordingly and check for doneness carefully.
Finally, if you want to simplify, you can skip the cream cheese in the whipped cream for a plain whipped cream frosting or substitute mascarpone for an even tangier finish. I encourage trying different options and finding what feels like your personal “signature” version of this delightful recipe.
Storage and Reheating
Storing Leftovers
To keep your leftover cake fresh, I recommend storing it in an airtight container or covering it with a cake dome or large bowl. If you don’t have a covered cake stand, placing the cake in a tall baking dish and then covering it works perfectly. Keep it refrigerated, where it will stay fresh for up to 2 to 3 days. The cream will firm up nicely, making slicing cleaner and holding the strawberry layers together.
Freezing
This cake freezes well, especially if you want to save part of it for later. Wrap individual slices tightly in plastic wrap, then place them in a freezer-safe container or ziplock bag to protect from freezer burn. You can freeze the slices for up to one month. When ready to enjoy, thaw frozen pieces in the fridge overnight for the best texture and flavor retention.
Reheating
Since this cake is cream-based and fresh-fruit filled, I do not recommend reheating it as that can cause the whipped cream to break down and strawberries to become mushy. Instead, serve it chilled or at room temperature. If you prefer it slightly warmer, let slices sit at room temp for 20-30 minutes before eating—the cream softens just enough without losing structure. Avoid microwaving to keep the texture and flavor intact.
FAQs
Can I use regular green tea powder instead of matcha?
Regular green tea powder does not have the same fine texture or concentrated flavor as culinary matcha, so I wouldn’t recommend substituting it. Matcha powder is specifically ground to be vibrant and smooth, which is essential for both the green color and that delicate, grassy taste in the cake.
How do I know when the cake is fully baked?
After baking for about 15 to 20 minutes, gently press the surface of the cake with your finger. It should feel springy and bounce back slowly. If it leaves an indentation or feels wet, it needs a few more minutes. Using a toothpick to test that it comes out clean is another reliable method.
Can I make this cake ahead of time?
Absolutely! The cake layers can be baked a day ahead and wrapped tightly in plastic wrap. The whipped cream and strawberry filling are best made the same day you plan to serve for freshness, but you can prepare the cream cheese mixture and strawberries separately in advance to save time.
What if I can’t find fresh strawberries?
While fresh strawberries are ideal for their texture and flavor, you can substitute with frozen strawberries that have been thawed and drained well. Just be aware the excess moisture can affect the cream, so pat them dry carefully and perhaps reduce the whipped cream slightly.
Is the cream cheese necessary in the whipped cream?
I love adding cream cheese because it adds a subtle tang and firmness that balances the sweetness, but it’s not absolutely necessary. You can make a plain whipped cream frosting instead, though the texture might be softer and less stable over time.
Conclusion
If you’re looking for a cake that feels both special and approachable, this Matcha Strawberry Layer Cake Recipe is one of my absolute favorites to make and share. It brings together bright, fresh fruit and luscious cream with that unforgettable hint of matcha in every bite. I truly hope you give it a try soon—you might just find yourself turning to it often the way I do!
“`