
Why You’ll Love This Recipe
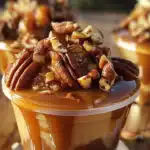
I love how simple and indulgent this recipe is. No baking means I can whip up a batch in no time, and the layers of graham cracker crust, velvety cream filling, chopped pecans, and gooey caramel are absolutely irresistible. They’re perfect for fall gatherings or holiday tables, but honestly, I make them all year long.
Ingredients
(Here’s a tip: Check out the full list of ingredients and measurements in the recipe card below.)
Crust:
-
1 ½ cups graham cracker crumbs
-
¼ cup granulated sugar
-
6 tablespoons melted unsalted butter
Filling and Topping (common additions for this dessert):
-
Cream cheese (softened)
-
Whipped topping (or homemade whipped cream)
-
Powdered sugar
-
Vanilla extract
-
Chopped pecans
-
Caramel sauce (store-bought or homemade)
Note: You didn’t include the full list for the filling, so I’m including standard ingredients typically used in caramel pecan cups for a creamy no-bake filling.
Directions
-
Make the crust: I combine the graham cracker crumbs, sugar, and melted butter in a bowl. Once everything’s evenly mixed, I press the mixture into the bottoms of small dessert cups or jars to form the crust. I like to chill them in the fridge while I prepare the filling.
-
Make the filling: In a separate bowl, I beat the softened cream cheese with powdered sugar and vanilla until smooth. Then I fold in the whipped topping gently to keep the filling light and fluffy.
-
Assemble the cups: I spoon or pipe the cream cheese mixture over the chilled crust layer.
-
Top with caramel and pecans: I drizzle generous amounts of caramel sauce over each cup and sprinkle chopped pecans on top for that sweet, nutty crunch.
-
Chill: I refrigerate the cups for at least 1–2 hours to let the layers set.
-
Serve: Just before serving, I sometimes add an extra drizzle of caramel or a dollop of whipped cream.
Servings and Timing
This recipe makes about 6–8 small dessert cups depending on the size of the containers I use. Prep time is roughly 15–20 minutes, plus 1–2 hours of chilling. Since there’s no baking involved, it’s a great make-ahead dessert.
Variations
Here’s how I like to switch it up sometimes:
-
Chocolate twist: I add mini chocolate chips to the filling or drizzle chocolate sauce along with the caramel.
-
Spiced crust: I mix a little cinnamon or nutmeg into the crust for a warm, fall flavor.
-
Nut alternatives: Toasted walnuts or almonds also taste amazing if I don’t have pecans.
-
Pumpkin version: I mix in a few spoonfuls of canned pumpkin and some pumpkin spice into the cream cheese mixture for a seasonal variation.
Storage and Reheating
These dessert cups store perfectly in the fridge in a covered container for up to 3 days. I keep them chilled until ready to serve. Since they’re no-bake and cream-based, I don’t freeze them—the texture changes too much after thawing.
FAQs
Can I use store-bought crust?
Yes, I sometimes use pre-made mini graham crusts or crushed cookie crusts to save time—just spoon in the filling and go.
Can I make these the night before?
Absolutely. I often prepare them the day before a gathering and keep them chilled until ready to serve. The flavors get even better.
Can I make it without cream cheese?
Cream cheese gives the filling structure and tang, but for a lighter version, I’ve used whipped topping alone or with instant pudding mix for a mousse-like texture.
What caramel works best?
I use thick, good-quality store-bought caramel or make a quick stovetop caramel. I avoid thin syrups—they tend to soak into the filling too much.
Do I need to toast the pecans?
Toasting is optional, but I love the extra flavor it adds. A quick toast in a dry pan for a few minutes makes a big difference.
Conclusion
No-Bake Caramel Pecan Dessert Cups are a creamy, crunchy, caramel-drizzled dream in a cup. With no oven required and just a few simple steps, I can pull together a crowd-pleasing dessert that looks impressive and tastes even better. Whether I’m serving them at a party or savoring one on a quiet night, they always deliver that perfect fall bite.
No-Bake Caramel Pecan Dessert Cups
5 Stars 4 Stars 3 Stars 2 Stars 1 Star
No reviews
- Author: Mia
- Total Time: 1 hour 15 minutes
- Yield: 6–8 dessert cups
- Diet: Vegetarian
Description
These no-bake caramel pecan dessert cups are rich, creamy, and layered with buttery graham crust, sweet caramel, and crunchy pecans—fall dessert made easy!
Ingredients
Crust Ingredients:
1 ½ cups graham cracker crumbs
¼ cup granulated sugar
6 tablespoons unsalted butter, melted
Filling (suggested for completion):
1 package (8 oz) cream cheese, softened
1/3 cup powdered sugar
1/2 teaspoon vanilla extract
1 cup whipped topping (like Cool Whip)
1/2 cup caramel sauce (plus more for drizzling)
1/2 cup chopped pecans
Instructions
Make the crust: In a bowl, mix graham cracker crumbs, sugar, and melted butter until combined. Press about 2 tablespoons of the mixture into the bottoms of 6–8 small dessert cups. Chill in the refrigerator while you prepare the filling.
Prepare the filling: In a mixing bowl, beat cream cheese, powdered sugar, and vanilla until smooth. Fold in whipped topping until fully combined.
Assemble: Spoon or pipe the creamy mixture over the chilled crusts. Top each with a generous drizzle of caramel sauce and a sprinkle of chopped pecans.
Chill and serve: Refrigerate for at least 1 hour before serving. Optionally, garnish with extra whipped topping and more caramel or pecans.
Notes
Swap graham crackers for crushed Biscoff or gingersnaps for added fall flavor.
You can use homemade or store-bought caramel sauce.
These cups can be made up to 2 days in advance and stored covered in the fridge.
- Prep Time: 15 minutes
- Category: Dessert
- Method: No-Bake
- Cuisine: American

