
Why You’ll Love This Recipe
I love this recipe for its simplicity and flavor—it’s like dessert and a memory in one bite. The bright orange zest and juice bring zing to the creamy vanilla base, while the whipped cream keeps it light and airy. It’s perfect for warm weather, easy to prep ahead, and ideal for birthdays, barbecues, or casual weekend indulgence. No baking required, and it sets up beautifully in the fridge.
ingredients
(Here’s a tip: Check out the full list of ingredients and measurements in the recipe card below.)
For the crust:
1 1/2 cups graham cracker crumbs
1/4 cup granulated sugar
1/2 cup unsalted butter, melted
For the filling:
16 oz cream cheese, softened
1/2 cup powdered sugar
1 tablespoon orange zest
1/2 cup orange juice (fresh or bottled)
1 teaspoon vanilla extract
1 cup heavy whipping cream
Optional topping:
Whipped cream
Orange slices or zest
directions
-
I start by combining the graham cracker crumbs, sugar, and melted butter in a medium bowl. I press the mixture into the bottom of a 9-inch springform pan and pop it in the fridge while I make the filling.
-
In a large bowl, I beat the softened cream cheese until smooth and lump-free. Then I add the powdered sugar, orange zest, orange juice, and vanilla extract. I mix until everything is well blended and creamy.
-
In a separate bowl, I whip the heavy cream until stiff peaks form. This step gives the cheesecake its light, mousse-like texture.
-
I gently fold the whipped cream into the orange cream cheese mixture, taking care not to deflate it, until it’s fully incorporated and smooth.
-
I pour the filling over the chilled crust and smooth the top with a spatula.
-
I refrigerate the cheesecake for at least 6 hours—or overnight—to let it set completely.
-
Just before serving, I add a generous swirl of whipped cream and garnish with orange slices or zest if I want to dress it up.
Servings and timing
Servings: 12 slices
Prep time: 20 minutes
Chill time: 6 hours
Total time: 6 hours 20 minutes
Calories: 410 kcal per slice
Variations
-
I sometimes use crushed vanilla wafers or gingersnaps instead of graham crackers for the crust.
-
For an extra-orange twist, I mix in a few drops of natural orange extract or a tablespoon of orange gelatin powder.
-
I’ve also added a thin layer of orange marmalade between the crust and filling for more citrus flavor.
-
If I want a swirl effect, I mix a bit of orange curd into the filling before pouring it into the crust.
-
For a lighter version, I use light cream cheese and swap part of the cream with Greek yogurt.
storage/reheating
I store leftovers covered in the refrigerator for up to 4–5 days. It holds its shape well and stays creamy. I don’t recommend freezing this cheesecake—it can change the texture once thawed. No reheating needed—this dessert is meant to be served chilled.
FAQs
Can I use bottled orange juice?
Yes, I’ve used both fresh and bottled orange juice. Fresh gives a slightly brighter taste, but bottled works just fine.
How do I know when it’s fully set?
After at least 6 hours in the fridge, the center should be firm to the touch and slice cleanly. Overnight chilling gives the best results.
Can I make this ahead?
Absolutely. I usually make it a day in advance to give it time to set and to make prep on the day of serving easier.
Can I use Cool Whip instead of whipped cream?
Yes, I’ve done that when I’m short on time. It changes the texture slightly but still gives a light, fluffy filling.
How do I get the crust to hold together?
I press it firmly into the pan and chill it before adding the filling. The butter binds it as it cools, so it slices cleanly.
Conclusion
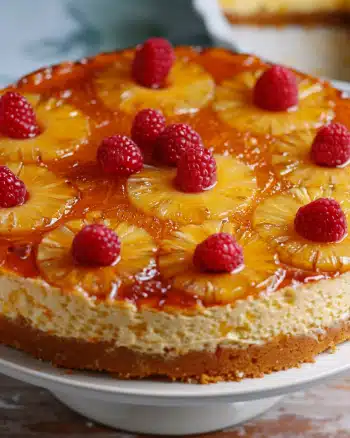
This No-Bake Orange Creamsicle Cheesecake is a nostalgic, citrusy delight that’s as easy to make as it is to enjoy. Creamy, sweet, and light with just the right tang, it’s the perfect dessert to cool down a warm day or bring something bright to the table. I love making it ahead and watching the smiles when I slice into this vibrant, dreamy treat.
Print
No-Bake Orange Creamsicle Cheesecake
- Total Time: 6 hours 20 minutes
- Yield: 12 slices
- Diet: Vegetarian
Description
This light and citrusy cheesecake blends orange and vanilla into a dreamy, chilled dessert. With a buttery graham crust and creamy filling, it’s perfect for summer gatherings.
Ingredients
For the crust:
1 1/2 cups graham cracker crumbs
1/4 cup granulated sugar
1/2 cup unsalted butter, melted
For the filling:
16 oz cream cheese, softened
1/2 cup powdered sugar
1 tablespoon orange zest
1/2 cup orange juice (fresh or bottled)
1 teaspoon vanilla extract
1 cup heavy whipping cream
Optional topping:
Whipped cream
Orange slices or zest
Instructions
Combine graham cracker crumbs, sugar, and melted butter in a bowl. Press into the bottom of a 9-inch springform pan. Chill while making the filling.
In a large bowl, beat cream cheese until smooth. Add powdered sugar, orange zest, orange juice, and vanilla extract. Mix until fully combined.
In a separate bowl, whip heavy cream until stiff peaks form.
Gently fold whipped cream into the orange-cream cheese mixture until smooth and airy.
Pour filling over chilled crust. Smooth the top.
Refrigerate for at least 6 hours or overnight until set.
Before serving, top with whipped cream and garnish with orange zest or slices if desired.
Notes
Substitute the graham cracker crust with crushed vanilla wafers or gingersnaps for extra flavor.
Add orange extract or orange gelatin powder to intensify citrus flavor.
For a swirl effect, fold in orange curd before chilling.
Light cream cheese and Greek yogurt can be used for a lower-calorie option.
- Prep Time: 20 minutes
- Category: Dessert
- Method: No-Bake
- Cuisine: American


