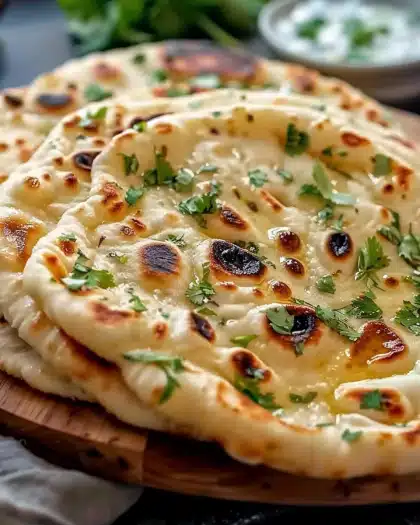
I absolutely love sharing this No Yeast Buttermilk Bread Recipe with anyone who enjoys fresh, homemade bread without the fuss of yeast. It’s one of my go-to recipes when I want something comforting, tender, and flavorful, but without the long wait for rising. This bread delivers a lovely golden crust, a soft crumb, and that perfect tang from the buttermilk—all with ingredients you probably already have in your kitchen. Whether for a quick snack or a comforting accompaniment to dinner, this recipe feels like a warm hug from the oven every time I make it.
Why You’ll Love This No Yeast Buttermilk Bread Recipe
What really hooks me on this No Yeast Buttermilk Bread Recipe is the flavor. The tangy buttermilk adds a subtle depth that makes each bite taste fresh and a little special. Combined with the delicate sweetness from the sugar and the light crunch from the oats topping, it’s a wonderful balance of textures and tastes. I think the crust is just right—not too hard, but beautifully golden and slightly crisp, making it ideal for slathering with butter or dipping into soups.
Another thing I adore about this recipe is how incredibly approachable it is. No yeast means no waiting for dough to rise, so I can whip it up on a whim. The process is simple, and there’s something so satisfying about mixing everything in one bowl, shaping the dough by hand, and popping it into a preheated skillet in the oven. It’s perfect for casual weeknight dinners, weekend brunches, or even holidays when you want a handmade, rustic bread without complicated techniques. It truly stands out because it feels homemade, fresh, and comfortingly honest.
Ingredients You’ll Need

These ingredients are simple but each brings something essential to the bread’s taste and texture. From the flour that forms the structure, to the baking soda that gives it rise, every item plays its part perfectly.
- 3 1/2 cups all-purpose flour: Provides the perfect base for a tender yet sturdy bread crumb.
- 2 tablespoons sugar: Adds a touch of sweetness and helps with browning the crust.
- 1 1/4 teaspoons kosher salt: Balances the flavors and enhances the overall taste.
- 1 1/4 teaspoons baking soda: Acts as the leavening agent, creating that light, airy texture without yeast.
- 1 1/2 cups buttermilk: Brings tanginess and acidity that tenderizes the bread.
- 1/4 cup unsalted butter (melted): Adds richness and moisture, contributing to a soft crumb.
- 1 tablespoon rolled oats: Sprinkled on top for a rustic appearance and slight texture contrast.
Directions
Step 1: Preheat your oven to 375 degrees Fahrenheit and place a 10-inch cast iron skillet or Dutch oven inside. This ensures the pan is hot and ready to give the bread that perfect crust.
Step 2: In a large bowl, whisk together the flour, sugar, kosher salt, and baking soda until everything is well combined. This dry mixture will be the foundation of your bread’s structure.
Step 3: In a separate bowl or large glass measuring cup, whisk the buttermilk and melted butter together until smooth. Pour this wet mixture over the dry ingredients and stir with a rubber spatula just until a wet, sticky dough forms; don’t overmix.
Step 4: Lightly flour a clean surface and gently knead the dough a few times to bring it together. Shape it into an 8-inch round about 1-inch thick, adding a little flour if it’s too sticky. Be soft with your kneading to keep the bread tender.
Step 5: Carefully transfer the dough into the preheated skillet. Use a sharp knife or bread lame to cut a 1/2-inch deep “X” across the top. Brush the surface with a little extra buttermilk and sprinkle the rolled oats evenly over the top.
Step 6: Place the skillet in the oven and bake for about 35 minutes, until the bread is golden brown on top and sounds hollow when you tap the bottom. This hollow sound means it’s perfectly baked through.
Step 7: Remove the bread from the oven and serve warm. Fresh from the pan, it’s absolutely irresistible with butter, preserves, or just on its own.
Servings and Timing
This recipe makes about 8 hearty servings, perfect for a family gathering or meal prep for a few days. Prep time is very manageable, around 10 to 15 minutes, since there’s no yeast to activate or waiting for rising. Baking takes approximately 35 minutes, so the total time from start to finish is about 55 minutes. Cooling is minimal—just a few minutes to let it set before slicing and serving.
How to Serve This No Yeast Buttermilk Bread Recipe

One of my favorite ways to enjoy this bread is warm, slathered generously with creamy butter or a spread of your favorite jam. It’s a fantastic companion to hearty soups like tomato basil or creamy potato leek, soaking up those rich flavors beautifully. For sandwiches, I’ve found it pairs wonderfully with classic deli meats, sharp cheeses, and plenty of fresh veggies.
When I serve this bread during gatherings, I love to garnish the loaf with fresh rosemary or thyme sprigs on the side for a rustic, inviting presentation. You can slice it into thick wedges and arrange them on a wooden board with small bowls of olive oil and balsamic vinegar for dipping—a simple yet elegant touch.
As for drinks, this bread is incredibly versatile. It goes well with a light white wine like Sauvignon Blanc for a dinner, or even a chilled kombucha or iced tea for a cozy brunch setting. I recommend serving it warm or at room temperature—the crumb is so tender and inviting that reheating it just a little brings it back to its freshest state.
Variations
I’m always excited to experiment with this recipe. For example, swapping part of the all-purpose flour for whole wheat flour gives the bread a nuttier flavor and heartier texture, great for a more rustic vibe. If you want a dairy-free version, you can substitute buttermilk with a mixture of plant-based milk and a tablespoon of lemon juice or vinegar to mimic acidity. Just use coconut or almond milk and let it sit for 5 minutes to curdle before mixing.
Flavor-wise, I sometimes add herbs like dried oregano or thyme directly into the dough to give it a fragrant twist that pairs beautifully with savory meals. You can also mix in some grated cheddar cheese or chopped olives for a savory twist that makes it perfect for entertaining. Baking in a Dutch oven with a lid on for the first 20 minutes can give the bread an even crisper crust if you want to try a different texture.
Storage and Reheating
Storing Leftovers
If you have leftover bread, I recommend wrapping it tightly in foil or placing it in an airtight container at room temperature. This helps keep the crust from getting too hard while maintaining the moist crumb inside. Stored like this, it will stay fresh for up to 2 days, which is plenty of time in my house before it gets devoured.
Freezing
This No Yeast Buttermilk Bread Recipe freezes very well. Wrap the cooled loaf tightly in plastic wrap and then place it inside a freezer-safe resealable bag to prevent freezer burn. It can be frozen for up to 3 months. When you want to enjoy it, simply thaw it at room temperature before reheating for the best results.
Reheating
To bring back that fresh-from-the-oven taste and texture, I reheat slices in a toaster oven or regular oven at 300 degrees Fahrenheit for about 5 to 8 minutes. This revives the crust and softens the crumb nicely. Avoid microwaving if you can—it tends to make the bread rubbery or chewy. A little extra butter while reheating makes it just heavenly all over again.
FAQs
Can I use regular milk instead of buttermilk?
Regular milk doesn’t provide the same acidity and tang that buttermilk does, which are essential for the bread’s texture and flavor. However, you can make a buttermilk substitute by adding 1 tablespoon of lemon juice or white vinegar to 1 1/2 cups of milk and letting it sit for 5 to 10 minutes. This works beautifully in this recipe.
Why doesn’t this bread require yeast?
This bread relies on baking soda as a leavening agent rather than yeast. Baking soda reacts with the acidity in buttermilk to produce carbon dioxide bubbles that help the dough rise. This process is much faster, so you don’t have to wait for the dough to rise like with yeast bread.
Can I make this bread gluten-free?
I haven’t tried it with gluten-free flour blends, but you could experiment by substituting the all-purpose flour with a high-quality gluten-free blend that includes xanthan gum for structure. Keep in mind that the texture might be denser, and you may need to adjust the liquid slightly to get the right consistency.
What’s the best way to know when the bread is fully baked?
A simple way is to tap the bottom of the bread. If it sounds hollow, it’s done baking. Also, the crust should be a deep golden brown. If you have a kitchen thermometer, the internal temperature should be around 200 degrees Fahrenheit for fully cooked bread.
Can I add seeds or nuts to this bread?
Definitely! I love sprinkling sunflower seeds, flaxseeds, or pumpkin seeds on top before baking, or folding chopped nuts like walnuts or pecans into the dough. They add a wonderful crunch and extra flavor that make this simple bread feel gourmet.
Conclusion
I hope you’ll give this No Yeast Buttermilk Bread Recipe a try because it truly is one of the easiest and most rewarding breads to make at home. Every time I bake it, I’m reminded how simple ingredients and uncomplicated methods come together to create something incredibly comforting and delicious. It’s perfect for so many meals and occasions, and I can’t wait for you to make it part of your kitchen favorites too.