I am absolutely delighted to share my Swedish Sticky Cake Recipe with you — it’s one of those simple, cozy desserts that feels like a warm hug in cake form. The rich, chocolatey layers paired with the luscious, silky topping create a harmony of flavors and textures that never fails to brighten any occasion. When I make this cake, it brings a little slice of Sweden right into my kitchen, and I know it will do the same for you.
Why You’ll Love This Swedish Sticky Cake Recipe
What I adore about this recipe is how it perfectly balances bold chocolate flavor with a moist, tender crumb that stays just sticky enough to keep you coming back for more. The cocoa powder in the batter lends a deep richness, while the sweet, creamy chocolate icing delivers a luscious finish that melts beautifully in your mouth. Every bite is indulgent but never overwhelming, which makes it so easy to enjoy again and again.
From my experience, this cake is incredibly forgiving and straightforward to make. I love that it doesn’t require fancy techniques or hard-to-find ingredients, yet it looks and tastes like a dessert you’d find in a charming café. It’s perfect for serving at family gatherings, casual get-togethers, or even a quiet evening treat after a busy day. What really sets it apart is the gooey chocolate topping that sets just enough to be firm but still decadently sticky, a little trick that truly elevates the whole dessert.
Ingredients You’ll Need

The beauty of this Swedish Sticky Cake Recipe lies in its simplicity — just a handful of pantry staples that come together to create something truly special. Each ingredient plays a vital role in building the rich flavor, tender texture, and inviting appearance that make this dessert unforgettable.
- Butter (⅔ cup, melted): Adds moisture and richness to the cake, ensuring it stays chewy and flavorful.
- Granulated sugar (1 1/3 cups): Sweetens the cake and helps create that irresistible sticky texture.
- Eggs (2): Provide structure and help bind the ingredients while keeping the cake tender.
- Vanilla extract (1 teaspoon): Enhances the sweetness and adds warmth to the overall flavor.
- All-purpose flour (3/4 cup): Forms the base of the cake batter, contributing to the soft and chewy crumb.
- Unsweetened cocoa powder (1/3 cup): Delivers deep chocolate flavor and beautiful color.
- Salt (1/2 teaspoon): Balances sweetness and intensifies the chocolate notes.
- Heavy cream (1/2 cup): Creates the luxurious, creamy base for the chocolate topping.
- Semisweet chocolate chips (1 1/3 cups): Melt into a smooth, glossy topping that’s irresistible.
- Vanilla extract (1/2 teaspoon for topping): Adds an extra touch of flavor to the chocolate icing.
Directions
Step 1: Preheat your oven to 325 degrees Fahrenheit and grease an 8-inch round springform pan thoroughly to make sure the cake releases easily.
Step 2: In a large bowl, combine the granulated sugar and melted butter. Stir them together until the mixture is smooth and evenly blended — this is your cake’s moist base.
Step 3: Beat in the eggs and vanilla extract. Make sure everything is fully incorporated; the batter should look glossy and inviting.
Step 4: Sift the flour, cocoa powder, and salt together. Add these dry ingredients to the wet mixture and gently fold until just combined. Be careful not to overmix, or the cake might become dense.
Step 5: Spoon the batter into your prepared pan and spread it into a thin, even layer — this will help it bake uniformly and create that signature sticky texture.
Step 6: Bake the cake for 17 to 20 minutes. You want the center to be just set, so keep an eye on it to avoid overbaking.
Step 7: While the cake cools, prepare the icing. Place the heavy cream in a microwave-safe bowl and heat for about 1 minute until hot but not boiling. Add the chocolate chips and vanilla extract, then let sit for 5 minutes to melt the chocolate fully.
Step 8: Stir the chocolate mixture thoroughly until smooth and glossy, about 1 to 2 minutes of mixing. Pour this luscious topping evenly over the cooled cake.
Step 9: Allow the cake to set at room temperature for about 1 hour so the topping firms up slightly, then refrigerate until ready to serve.
Step 10: Before serving, carefully remove the cake from the springform pan and transfer it to a serving plate. Slice and enjoy every sticky, chocolatey bite!
Servings and Timing
This recipe yields about 8 to 10 generous servings, making it perfect for small parties or family dinners. You’ll spend roughly 10 minutes prepping the batter and topping, 17 to 20 minutes baking, about 1 hour letting the icing set at room temperature, plus some chilling time in the refrigerator to fully firm up the cake. Altogether, including cooling and chilling, plan for approximately 2 hours from start to finish. Trust me, it is absolutely worth the wait!
How to Serve This Swedish Sticky Cake Recipe

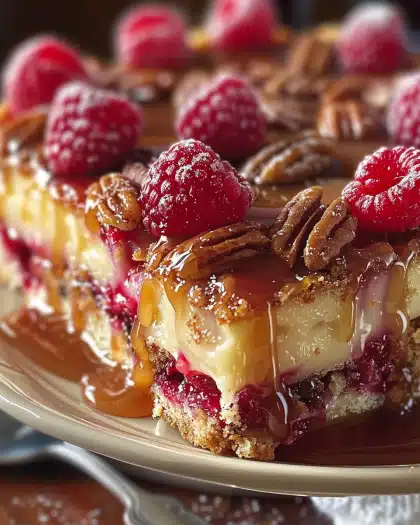
When I serve this cake, I like to keep it simple so its rich flavors can shine. A dollop of freshly whipped cream or a scoop of vanilla ice cream on the side complements the chocolate topping beautifully without overpowering it. For a touch of freshness, I sometimes add a handful of fresh raspberries or sliced strawberries — their tartness adds lovely contrast.
I often garnish the cake with a sprinkle of powdered sugar or a few chocolate shavings for a little extra visual charm. When plating, I cut fairly generous wedges to showcase the sticky, gooey topping, which is truly the star of the show. This cake is fantastic served at room temperature after chilling because the topping sets perfectly — but I’ve also enjoyed it slightly warmed with melting edges.
For drinks, I love pairing this Swedish Sticky Cake Recipe with a strong coffee or a glass of rich red wine like a Cabernet Sauvignon. If you prefer non-alcoholic options, a spiced chai tea really complements the warmth of the chocolate. This cake shines at celebrations, after family dinners, or even as a special midweek treat when you want to indulge and impress without fuss.
Variations
I’ve tried customizing this Swedish Sticky Cake Recipe in a few fun ways that I’d love to share. For instance, swapping out semisweet chocolate chips for dark chocolate intensifies the richness, while mixing in a pinch of cinnamon or chili powder into the batter adds unexpected warmth and depth. You can also experiment by adding chopped nuts like walnuts or pecans to the topping for a delightful crunch.
If you’re aiming for a gluten-free version, simply replace the all-purpose flour with a gluten-free flour blend designed for baking — just be sure to add a little xanthan gum if your blend lacks it, to keep that chewy texture. For a vegan twist, substitute the butter with a plant-based alternative, use flax eggs in place of chicken eggs, and choose a non-dairy cream like coconut cream for the chocolate topping. The cake’s sticky, fudgy qualities still come through beautifully!
Different ovens and baking equipment can impact the cake’s texture, so I encourage you to try baking it in a square pan for a thicker cake or even mini muffin tins for individual portions — just reduce baking time accordingly and watch closely. These variations keep this recipe fresh and exciting while staying true to its irresistible essence.
Storage and Reheating
Storing Leftovers
I always store leftover Swedish Sticky Cake in an airtight container or cover it tightly with plastic wrap to maintain moisture and prevent it from absorbing other fridge odors. It keeps well in the refrigerator for up to 4 days. To keep that sticky topping perfect, make sure it’s set fully before covering so it doesn’t turn soggy.
Freezing
This cake freezes nicely if you want to save some for later. Wrap it tightly in plastic wrap and then foil to protect it from freezer burn. It’ll stay fresh for up to 2 months frozen. When you’re ready to enjoy, thaw it slowly in the refrigerator overnight, which helps preserve the texture of the topping and keeps the cake moist.
Reheating
To reheat slices, I recommend warming them gently in a microwave for about 15 to 20 seconds or until just warmed through. Avoid overheating to preserve that sticky topping’s texture and prevent the cake from drying out. If you want to serve slightly warm with melty edges, a brief 5-minute stint in a warm oven at 300°F works wonders — just watch carefully!
FAQs
Can I use regular cocoa powder instead of unsweetened cocoa powder?
For the best flavor, I suggest using unsweetened cocoa powder as it provides that deep chocolate intensity without added sugar. Using sweetened or Dutch-processed cocoa will change the sweetness level and texture, so if you substitute, adjust the sugar accordingly and expect a slightly different taste.
Is it necessary to use a springform pan for this cake?
While a springform pan makes it easier to remove the cake without damaging the sticky topping, you can use a well-greased regular 8-inch round cake pan. Just be extra careful when loosening the cake from the pan edges to keep the topping intact.
How sticky is the topping supposed to be?
The topping is meant to be glossy, slightly firm, and indulgently sticky — not dry or crumbly. It should give a bit when you slice into it but hold together nicely, providing that wonderful contrast to the soft cake layer beneath.
Can I make this cake ahead of time?
Absolutely! In fact, I find that making it a day ahead allows the flavors to meld and the chocolate topping to set perfectly. Just keep it refrigerated and bring to room temperature before serving for the best experience.
What alternatives can I use instead of heavy cream for the topping?
If you want to avoid dairy, full-fat coconut milk or a rich plant-based cream alternative works well as a substitute. The key is to use something creamy and fatty to melt the chocolate smoothly and create that luscious texture in the topping.
Conclusion
I genuinely hope you give this Swedish Sticky Cake Recipe a try — it’s one of those desserts that brings so much joy with so little fuss. From the first bite, you’ll feel the cozy charm that makes it a personal favorite of mine, and I’m confident it will become a beloved treat in your home too. Happy baking and even happier eating!