
Why You’ll Love This Recipe
I like this recipe because it combines two classics—cheesecake and red velvet cake—into one striking dessert. The texture is velvety smooth, the flavor is indulgent, and the deep red color makes it a real centerpiece. The “bite mark” decoration is simple to create but gives it the perfect spooky finish.
Ingredients
(Here’s a tip: Check out the full list of ingredients and measurements in the recipe card below.)
Crust:
-
1 1/2 cups chocolate cookie crumbs
-
1/4 cup melted butter
Cheesecake Filling:
-
24 oz cream cheese, softened
-
1 cup sugar
-
3 large eggs
-
1 tsp vanilla extract
-
1/2 cup sour cream
-
2 tbsp cocoa powder
-
2 tbsp red food coloring
Topping (optional):
-
Whipped cream
-
Red gel or raspberry sauce (for vampire “bites”)
Directions
-
I preheat the oven to 325°F and line the bottom of a springform pan with parchment paper.
-
To make the crust, I mix the cookie crumbs with melted butter and press the mixture firmly into the bottom of the pan.
-
In a large bowl, I beat the softened cream cheese with sugar until smooth and creamy.
-
I add the eggs one at a time, mixing on low speed until just combined.
-
I stir in the vanilla, sour cream, cocoa powder, and red food coloring until evenly mixed.
-
I pour the batter over the crust and smooth the top.
-
I bake for 50–60 minutes, until the center is just set but still slightly jiggly.
-
I turn off the oven, crack the door, and let the cheesecake cool slowly for 1 hour to prevent cracks.
-
After cooling, I refrigerate for at least 4 hours or overnight.
-
To decorate, I pipe or spoon two small dots of raspberry sauce or red gel on top and drag a toothpick through for “blood drips,” creating the vampire bite effect.
Servings and timing
This cheesecake serves about 10–12 slices. It takes around 20 minutes to prep, 1 hour to bake, and at least 4 hours to chill before serving.
Variations
Sometimes I swirl a bit of plain cheesecake batter with the red velvet layer for a marbled effect. I also like making this in mini cheesecake pans for individual servings. If I want a darker, more intense flavor, I add an extra tablespoon of cocoa powder.
storage/reheating
I keep the cheesecake covered in the refrigerator for up to 5 days. For longer storage, I freeze slices individually, wrapping them well in plastic wrap and foil, for up to 2 months. I thaw them in the refrigerator overnight before serving.
FAQs
Can I use a graham cracker crust instead of chocolate cookies?
Yes, I can. I personally prefer chocolate cookies for the dramatic look, but graham crackers will work just as well.
How do I keep my cheesecake from cracking?
I bake it low and slow, avoid overmixing the eggs, and let it cool gradually in the oven with the door slightly open.
Can I use gel food coloring instead of liquid?
Yes, gel food coloring works beautifully, and it often gives a deeper red color without thinning the batter.
What can I use instead of sour cream?
I sometimes use Greek yogurt for a lighter texture and it works nicely.
Can I make this cheesecake ahead of time?
Yes, I like to make it the day before because it needs time to chill and set, and the flavor improves overnight.
Conclusion
This vampire bite red velvet cheesecake is a decadent dessert with a playful, spooky twist. I love how the creamy red velvet filling pairs with the chocolate crust, and the dramatic “vampire bite” design makes it perfect for Halloween gatherings. It’s rich, festive, and always earns compliments at the table.
Print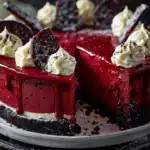
Vampire Bite Red Velvet Cheesecake
- Total Time: ~5 hours 30 minutes (with cooling)
- Yield: 12 slices
- Diet: Vegetarian
Description
Sinfully rich red velvet cheesecake with a chocolate crust and dramatic “vampire bite” swirl—perfect for spooky season.
Ingredients
For the Crust:
1½ cups chocolate cookie crumbs (like Oreos, without filling)
¼ cup melted butter
For the Red Velvet Cheesecake Filling:
24 oz cream cheese, softened (3 blocks)
1 cup granulated sugar
3 large eggs
1 tsp vanilla extract
⅓ cup sour cream
¼ cup cocoa powder
2 tbsp red food coloring (gel-based for bold color)
For the “Vampire Bite” Sauce (Optional but Fun):
½ cup raspberry or strawberry preserves
1–2 tsp lemon juice
Red gel food coloring (optional, for deeper red)
Optional Topping:
Whipped cream or cream cheese frosting
Extra “blood” drizzles or piped dots
Instructions
Prep Crust: Preheat oven to 325°F (163°C). Mix cookie crumbs and melted butter until moistened. Press into bottom of a 9-inch springform pan. Bake for 8 minutes, then let cool.
Make Cheesecake Batter: In a large bowl, beat cream cheese until smooth. Add sugar and mix well. Add eggs one at a time, beating after each addition.
Add Flavor & Color: Mix in vanilla, sour cream, cocoa powder, and red food coloring until evenly combined and velvety red.
Bake: Pour filling over cooled crust. Bake in a water bath for 50–60 minutes until center is just set with a slight jiggle. Turn off oven and let sit inside with door cracked for 1 hour.
Chill: Remove and cool completely. Chill in fridge for at least 4 hours or overnight.
Make “Bite” Sauce: Warm raspberry preserves with lemon juice and optional red food coloring. Use a straw or spoon to poke small “bite marks” in the cheesecake, then fill with sauce. Drizzle extra for effect.
Decorate & Serve: Add whipped cream or cream cheese frosting, extra blood drizzle, and serve chilled with drama!
Notes
For smooth cheesecake, use room temperature ingredients and don’t overbeat the batter.
Use gel food coloring for vibrant color without thinning the batter.
The raspberry sauce can be made ahead and stored in the fridge.
Use a toothpick or straw to make clean “bite marks” for the vampire theme.
- Prep Time: 20 minutes
- Cook Time: 55 minutes
- Category: Dessert, Halloween, Cheesecake
- Method: Baking (Oven)
- Cuisine: American


