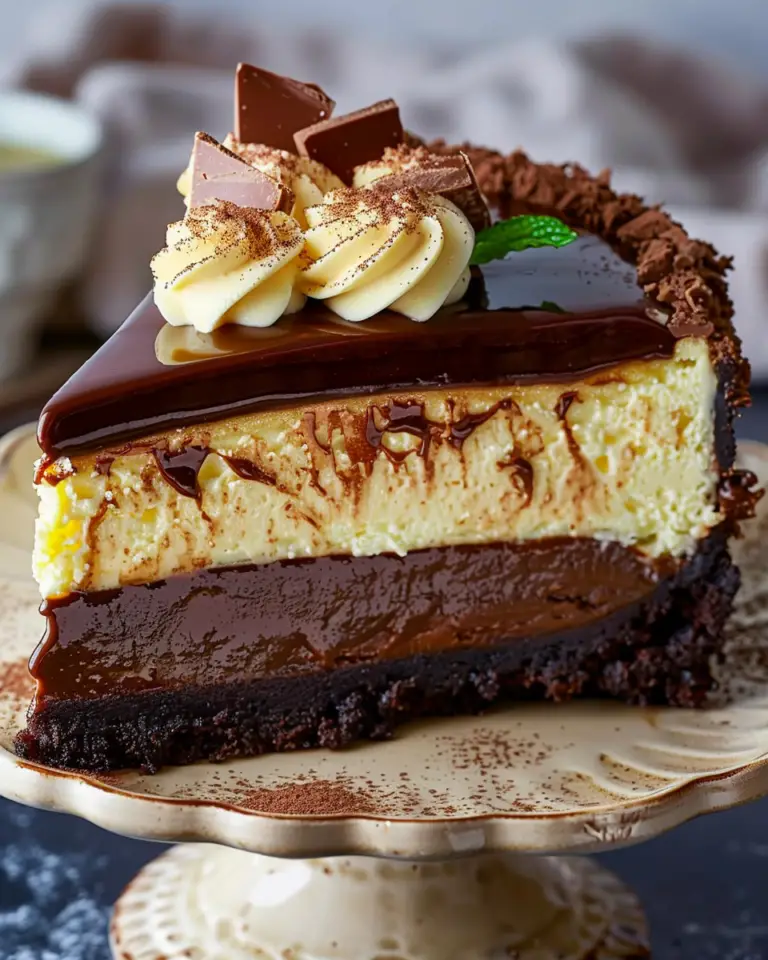
I absolutely love sharing this Gluten Free Cheesecake Recipe with anyone who needs a rich, creamy dessert that doesn’t compromise on flavor or texture. This cheesecake has become a personal favorite in my kitchen because it’s flawlessly smooth, with a perfectly crumbly gluten-free crust that adds just the right amount of buttery crunch. Whether you’re gluten intolerant or just looking for a deliciously decadent dessert to impress friends and family, this recipe hits every note for me — creamy, tangy, sweet, and utterly irresistible.
Why You’ll Love This Gluten Free Cheesecake Recipe
From the first bite of this cheesecake, I’m always struck by how well balanced the flavor profile is. It’s creamy yet light, with a subtle tang from the lemon juice and Greek yogurt that cuts through the rich sweetness, making it feel indulgent but never cloying. The hint of vanilla ties everything together beautifully while the gluten free graham cracker crust adds a buttery, slightly crunchy contrast that makes each mouthful a delight. Honestly, every element tastes thoughtfully combined, which I think is what makes it so special to me.
Another thing that makes this Gluten Free Cheesecake Recipe stand out is how approachable it is in the kitchen. I love that it doesn’t require any super complicated ingredients or techniques, yet the results look and taste like something out of a fancy bakery. The water bath trick keeps it perfectly moist and prevents cracking, so you don’t have to stress about presentation. I find myself reaching for this recipe for holidays, birthdays, or when I want to wow guests, because it’s reliable, impressive, and a crowd-pleaser every single time.
Ingredients You’ll Need

Here’s the simple, yet essential lineup of ingredients that come together to make this cheesecake so wonderful. Each one plays a crucial role in balancing flavor, providing structure, and creating that irresistible creamy texture.
- Gluten free graham cracker crumbs: These form the base crust, providing buttery crunch and that classic cheesecake foundation.
- Granulated sugar: Used both in the crust and the filling, it sweetens just enough without overpowering.
- Salt: Just a pinch to enhance the flavors and balance the sweetness.
- Unsalted butter, melted: Binds the crust together and adds richness.
- Cream cheese (room temperature): The star of the cheesecake, bringing that creamy, tangy body.
- Gluten free flour: Helps stabilize the batter for a smooth, firm cheesecake.
- Pure vanilla extract: Adds warmth and depth to every bite.
- Lemon juice: Adds a fresh tang to brighten the rich filling.
- Large eggs: Provide structure and help set the cheesecake during baking.
- Full-fat plain Greek yogurt: Adds a subtle tang and creaminess while keeping the texture silky smooth.
Directions
Step 1: Preheat your oven to 350°F and prepare your springform pan by tightly wrapping the bottom and sides with heavy-duty aluminum foil. This will protect the crust during baking in the water bath. Spray the inside of the pan with nonstick spray so the cheesecake releases easily later.
Step 2: In a medium bowl, combine the gluten free graham cracker crumbs, sugar, and salt. Pour the melted butter over and mix with a fork until the crumbs are evenly moistened and clump together slightly. If it’s too wet or dry, adjust with small amounts of crumbs or butter until the texture is just right.
Step 3: Press the crust mixture firmly into the bottom and about ¾ to 1-inch up the sides of your prepared pan. Use your hands or a glass bottom to make sure it’s even and tightly packed. Bake the crust for 7 to 9 minutes until it’s golden and slightly crisp. Set it aside to cool a little while you prepare the filling.
Step 4: Lower your oven temperature to 325°F and boil a kettle of water – you’re going to need this for the water bath.
Step 5: In your stand mixer fitted with a paddle attachment, beat the cream cheese, sugar, and gluten free flour on medium speed until smooth and creamy. Scrape down the sides of the bowl to incorporate everything evenly.
Step 6: Add vanilla extract, lemon juice, and salt to the batter and mix just until combined. Then add the eggs one at a time, beating on low speed to avoid air bubbles. Scrape the bowl frequently to keep the texture uniform.
Step 7: Fold in the Greek yogurt until you have a smooth, lump-free batter.
Step 8: Place the crust-lined springform pan into a large roasting pan. Pour the cheesecake batter over the crust evenly. Carefully pour boiling water into the roasting pan, filling it so the water reaches about one inch up the sides of the springform pan – this water bath will keep the cheesecake moist and crack-free.
Step 9: Bake the cheesecake at 325°F for 1 hour and 30 minutes to 1 hour and 45 minutes. You want the top to be a nice golden brown and the center just set – it should not look liquidy.
Step 10: Remove the roasting pan from the oven and let it cool on the counter for at least one hour before removing the cheesecake pan from the water bath. Then carefully peel away the foil.
Step 11: Run a thin knife around the edges to loosen the cake, cover it with plastic wrap, and refrigerate overnight to help it fully set and develop flavor.
Step 12: When ready to serve, remove the springform sides and slice your perfectly creamy, gluten-free cheesecake. Add your favorite toppings and enjoy!
Servings and Timing
This recipe yields about 12 generous slices, making it perfect for sharing at a party or family gathering. Preparation takes roughly 25 minutes, with the crucial baking time spanning 1 hour and 30 minutes to 1 hour and 45 minutes. Don’t forget to factor in the 1 hour cooling period plus an overnight chill in the refrigerator, ideally 8 hours or more, to get the best texture and flavor from your cheesecake.
How to Serve This Gluten Free Cheesecake Recipe

I love serving this cheesecake chilled because it highlights the creamy texture and brings out the bright notes from the lemon and Greek yogurt. For an extra touch, I often garnish the top with fresh berries like raspberries or blueberries, which add a burst of color and a lovely contrast of tartness. Sometimes, I drizzle a bit of homemade raspberry sauce or a dusting of powdered sugar for that elegant look that impresses guests.
This cheesecake pairs beautifully with a variety of beverages. For something festive, a glass of late-harvest Riesling or Moscato complements the creamy sweetness perfectly. If you prefer a cocktail, I recommend a light fruity spritz or a glass of sparkling rosé. Non-alcoholic options like sparkling water infused with lemon and mint provide a refreshing balance. I find this dessert fits seamlessly into holiday dinners, birthday celebrations, or even a casual weekend dinner party where you want to end on a sweet note.
When plating, I like to cut slices about 1 1/2 inches wide to balance richness with indulgence. Serving on neutral plates lets the cheesecake’s golden crust and creamy filling shine. You can also serve it with a dollop of whipped cream or a small scoop of vanilla ice cream to add another layer of delight.
Variations
One of the things I love about this Gluten Free Cheesecake Recipe is how versatile it is. You can swap the gluten free graham cracker crumbs for ground almonds or gluten free digestive biscuits to change up the crust’s texture and flavor. For a dairy-free or vegan adaptation, I’ve experimented with vegan cream cheese alternatives and coconut yogurt, though you may need to adjust baking times slightly to accommodate the different moisture content.
If you enjoy bold flavors, try mixing fresh fruit purees like strawberry or mango into the batter, or swirl in some melted dark chocolate before baking for a marbled effect. You can also fold in finely chopped nuts for added crunch or top the finished cheesecake with caramelized nuts for a decadent finish.
For a quicker method, I have actually made individual cheesecakes in a muffin tin using this batter, which reduces baking time to about 30 minutes and makes for charming single-serve desserts perfect for parties. Just remember to reduce baking time and keep an eye on the center so they don’t overcook.
Storage and Reheating
Storing Leftovers
I always store any leftover cheesecake in an airtight container or tightly wrapped with plastic wrap in the refrigerator. This helps prevent the cake from absorbing other fridge odors and keeps it moist. Properly stored, it will stay fresh for up to 4 to 5 days, which is usually plenty of time to finish it off because it’s so delicious!
Freezing
This cheesecake freezes very well if you want to save some for later. I recommend freezing it without any fresh toppings to preserve texture. Wrap individual slices tightly in plastic wrap and then place them in a freezer-safe container or zip-top bag. It can be frozen for up to 2 months. When you’re ready to enjoy, thaw slices overnight in the refrigerator for best results.
Reheating
I actually prefer cheesecake cold or at room temperature rather than reheated, but if you want to serve it slightly warmer, let it sit out for 30 minutes before slicing. Avoid microwaving the cheesecake as it can cause the texture to become grainy or rubbery. The water bath baking method ensures a soft texture, so preserving that chill or gentle room temp is best for savoring the full flavor and creaminess.
FAQs
Can I use a regular graham cracker crust if I’m not gluten-free?
Absolutely! If gluten isn’t a concern, you can substitute regular graham cracker crumbs for the gluten-free ones, and the recipe will work just fine. Just keep the same amount and prepare the crust as usual for that classic flavor and texture.
What’s the purpose of the water bath in this cheesecake recipe?
The water bath helps regulate the temperature around the cheesecake while it bakes, which prevents cracks and keeps the filling incredibly smooth and creamy. It creates a bit of steam in the oven that gently cooks the batter, making a big difference in texture and appearance.
Can I make this cheesecake without a stand mixer?
Yes, you can use a hand mixer or even beat by hand with a sturdy whisk, although it will take a bit more effort to get the cream cheese smooth and lump-free. Just make sure to beat thoroughly and scrape the bowl often to incorporate all the ingredients evenly.
Why is the lemon juice included in the recipe?
Lemon juice adds a subtle brightness and slight tang which balances the richness of the cream cheese and Greek yogurt. It prevents the cheesecake from tasting too heavy or overly sweet, enhancing the overall flavor profile.
Is it okay to use low-fat cream cheese or Greek yogurt?
For the best texture and flavor, I recommend full-fat cream cheese and Greek yogurt. Lower-fat options can make the cheesecake less creamy and more dense, which affects the mouthfeel. That said, you can experiment if you want a lighter version, but expect some compromise in richness.
Conclusion
If you’re looking to wow your guests or simply treat yourself, I wholeheartedly encourage you to try this Gluten Free Cheesecake Recipe. It’s one dessert that keeps surprising me with how effortlessly delicious it turns out every time. The perfect balance of creamy, tangy, and sweet with a buttery gluten-free crust is truly a joy to make and even better to share. Dive in, enjoy every bite, and watch it become a beloved staple in your recipe collection just like it is in mine!