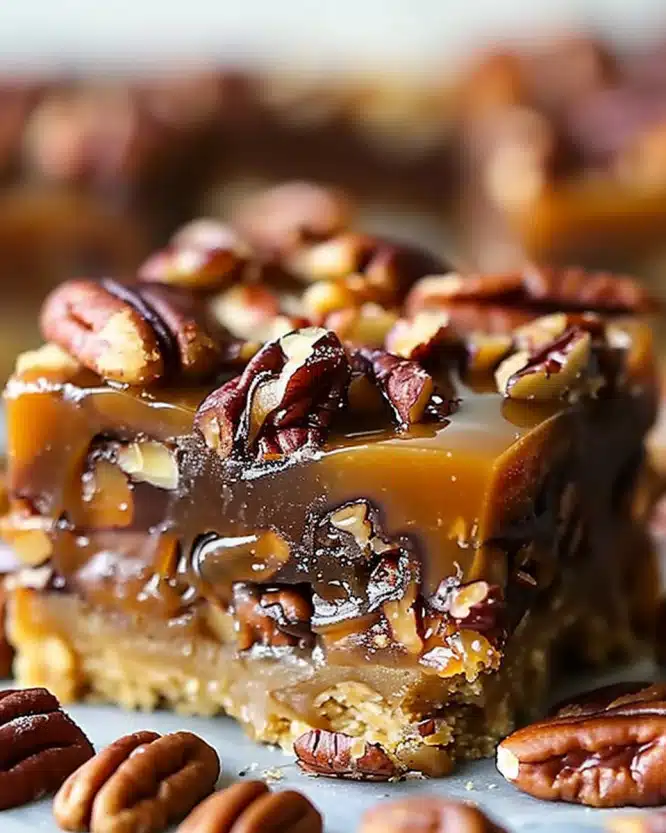
I absolutely adore sharing this Heavenly Chocolate Coconut Graham Cracker Bars Recipe with you because it’s one of those treats that feels like a warm hug wrapped in chocolate and coconut. The layers of buttery graham cracker crust, sweet creamy frosting, and rich chocolate top come together so beautifully—I’m always amazed at how simple ingredients can produce something so irresistibly delicious. Whether it’s a cozy family gathering or a random snack time, these bars never fail to bring smiles and compliments!
Why You’ll Love This Heavenly Chocolate Coconut Graham Cracker Bars Recipe
What makes this recipe truly special to me is the harmonious blend of textures and flavors. I love how the crunchy graham cracker base, dotted with coconut flakes and walnuts, gives a wonderful crunch beneath the smooth, buttery frosting and the luscious chocolate layer. The taste is perfectly balanced: sweet but not overly so, with a hint of nuttiness from the walnuts and a tropical touch from the coconut that keeps things exciting every bite.
Another reason I keep coming back to this recipe is its ease. I’m all about simple yet impressive desserts, and these bars fit the bill perfectly. The steps are straightforward and don’t require any fancy tools or complicated techniques, which means I can whip these up even on busy days. Plus, they’re fantastic for all sorts of occasions—family dinners, holiday parties, or just a cozy weekend treat. To me, these bars genuinely stand out because of their layered elegance paired with everyday simplicity.
Ingredients You’ll Need

This recipe is delightfully simple, relying on a handful of easily accessible ingredients that each play a key role in building the perfect bar. The balance of flavors and textures starts here, so choosing good quality ingredients makes a noticeable difference.
- Butter: Using room temperature butter is essential for both the bar base and frosting to achieve that creamy, smooth consistency.
- Granulated sugar: Adds the right touch of sweetness and helps with the texture in the base layer.
- Egg: Acts as a binder to hold everything together in the crumbly graham cracker base.
- Vanilla extract: Adds a warm, inviting aroma and depth to the flavors.
- Graham cracker crumbs: The foundation of the bars, providing that classic, lightly sweet crunchy bite everyone loves.
- Flaked coconut: Offers a chewy texture and tropical sweetness that makes these bars unique.
- Chopped walnuts: A nutty crunch to complement the coconut and enhance the base layer’s texture.
- Powdered sugar: The key to a silky smooth frosting that’s just sweet enough.
- Milk: Lightens the frosting to the perfect spreading consistency.
- Chocolate chips: The crowning glory of these bars, melting into a glossy, fudgy topping that seals the deal.
Directions
Step 1: Preheat your oven to 350°F. This is the perfect temperature to gently bake the base until golden and set without drying it out.
Step 2: In a large mixing bowl, beat together 1/2 cup of softened butter and 1/2 cup granulated sugar using an electric mixer until smooth and creamy. Then, add the egg and vanilla extract, mixing again just until combined.
Step 3: Stir in 2 cups of graham cracker crumbs, 1 cup of flaked coconut, and 1/4 cup chopped walnuts by hand. Make sure everything is well incorporated so every bite has a bit of each ingredient.
Step 4: Press this mixture evenly into a greased or parchment-lined 9×13-inch baking pan. Don’t hesitate to pack it down firmly to create a sturdy base.
Step 5: Bake in the preheated oven for 15 to 20 minutes, or until the edges are golden and the base feels set to the touch. Once done, remove from oven and set aside to cool completely before moving to the next step.
Step 6: While the base cools, whip up the frosting. Beat 1/2 cup softened butter until smooth, then gradually add 2 cups powdered sugar. Pour in 2 teaspoons of milk and continue beating for 2 to 3 minutes until light, fluffy, and easily spreadable.
Step 7: Spread this creamy frosting evenly over the cooled base layer. To make spreading even easier, I sometimes chill the bars briefly after adding the frosting before moving on to the chocolate layer.
Step 8: Melt 12 ounces of chocolate chips with 2 tablespoons of butter in 30-second intervals in the microwave, stirring in between to ensure smoothness. Once fully melted and glossy, pour and smooth the chocolate over the frosted base.
Step 9: Let the chocolate set at room temperature or in the fridge until firm. Then slice into 12 squares and serve to enjoy the magic!
Servings and Timing
This Heavenly Chocolate Coconut Graham Cracker Bars Recipe makes approximately 12 generous servings, perfect for sharing with friends or family. The prep time is about 15 minutes, with 15 to 20 minutes baking time. Allowing the bars to cool before frosting and chocolate layering adds roughly another 20 minutes, bringing the total time to about 50 to 60 minutes. If you chill the bars between frosting and chocolate layers, set aside an additional 15 minutes. That’s a very reasonable timeline for such a decadent and impressive dessert!
How to Serve This Heavenly Chocolate Coconut Graham Cracker Bars Recipe

I like to serve these bars slightly chilled or at room temperature so the chocolate topping has that perfect snap but the frosting remains creamy and soft. They’re ideal for dessert after a casual family meal or as a sweet treat at holiday parties. When it comes to plating, I recommend cutting them into tidy squares and placing them on a pretty dessert plate—sometimes I add a small dollop of whipped cream or a sprinkle of toasted coconut for an elegant touch.
They pair wonderfully with rich, bold coffee or a creamy hot chocolate for a cozy, comforting experience. For adult gatherings, I often suggest serving these bars alongside a glass of dessert wine, like a late-harvest Riesling or a smooth port, which complements the chocolate notes beautifully. They also make excellent finger foods for potlucks or picnics, thanks to their sturdy base and easy portion size.
If you’re looking to impress guests at a festive event, arranging these bars on a tiered dessert tray with fresh berries or edible flowers adds a charming, whimsical vibe. No matter the occasion, these bars feel like a lovingly prepared indulgence that everyone will appreciate.
Variations
Over time, I’ve experimented with some delicious twists on this recipe to suit different tastes and dietary needs. For instance, swapping walnuts for pecans or almonds adds a delightful change in flavor and texture. If coconut flake isn’t your favorite, toasted coconut can deepen the flavor, giving a nuttier, slightly caramelized profile.
If you’re looking to make these bars gluten-free, I’ve found that using gluten-free graham cracker crumbs works perfectly without compromising texture. For vegan variations, replace the butter with coconut oil or a plant-based margarine and use a flax egg instead of a regular egg. You can also try a dairy-free frosting by substituting butter and milk with coconut cream and powdered sugar, giving a rich and creamy layer compatible with vegan diets.
For flavor variations, adding a pinch of cinnamon or a splash of rum extract to the base can lend an intriguing twist. On the chocolate layer, mixing in chopped nuts or a sprinkle of sea salt on top before the chocolate sets is fantastic for an added contrast. If you prefer a stovetop or double boiler for melting chocolate instead of the microwave, that method offers more control over melting consistency and flavor clarity.
Storage and Reheating
Storing Leftovers
These bars keep wonderfully for up to 4 days when stored properly. I like to keep leftovers in an airtight container at room temperature to maintain the perfect balance between the crisp base and the soft frosting. If your kitchen is warm, storing them in the fridge is also fine, but be aware the chocolate might get firmer and frosting slightly denser.
Freezing
You can absolutely freeze these bars to enjoy later. I recommend slicing them first into individual portions, wrapping each square tightly in plastic wrap, and then placing them in a freezer-safe container or bag. Frozen bars last up to 2 months. When you’re ready to eat, simply thaw at room temperature for a few hours or overnight in the fridge for the best texture and flavor.
Reheating
I generally don’t recommend reheating these bars with heat because you want to preserve the contrast of textures between the crisp base and the chocolate topping. However, if you prefer them a bit softer, placing them in a warm oven at 250°F for about 5 minutes works well without melting the chocolate too much. Avoid microwaving as it can make the bars soggy or melt the frosting unevenly.
FAQs
Can I use a different type of nut instead of walnuts?
Absolutely! Pecans, almonds, or even macadamia nuts work beautifully in this recipe. Just chop them into similar-sized pieces so they bake evenly and maintain the texture balance with the coconut and graham cracker crumbs.
Is it okay to use sweetened coconut flakes or should I stick to unsweetened?
I prefer unsweetened coconut flakes because the recipe already has plenty of sweetness, but sweetened coconut can be used if you want a slightly more intense coconut flavor—just consider reducing other sugar slightly if you do.
Can I make these bars ahead of time? How far in advance?
Yes! These bars actually benefit from some resting time so the flavors meld and the layers set perfectly. I often make them a day ahead and keep them covered at room temperature or in the fridge, depending on your preference.
What if I don’t have an electric mixer for the frosting?
You can mix the frosting by hand with a sturdy whisk or wooden spoon, though it will take more effort to achieve the light, fluffy texture. Just be patient and mix vigorously to incorporate air.
Can I substitute dark chocolate chips for the regular chocolate?
Definitely! Dark chocolate adds a wonderful depth and slight bitterness that contrasts nicely with the sweet frosting and crunchy base. I recommend choosing a quality chocolate with 60-70% cocoa for the best flavor balance.
Conclusion
I truly hope you give this Heavenly Chocolate Coconut Graham Cracker Bars Recipe a try because it’s one of those timeless desserts that never disappoints. From the first buttery bite to the luscious chocolate finish, it’s pure joy wrapped in layers. Whether you’re treating yourself or sharing with loved ones, these bars bring a special kind of happiness to the table. I can’t wait to hear how much you enjoy making and eating them!