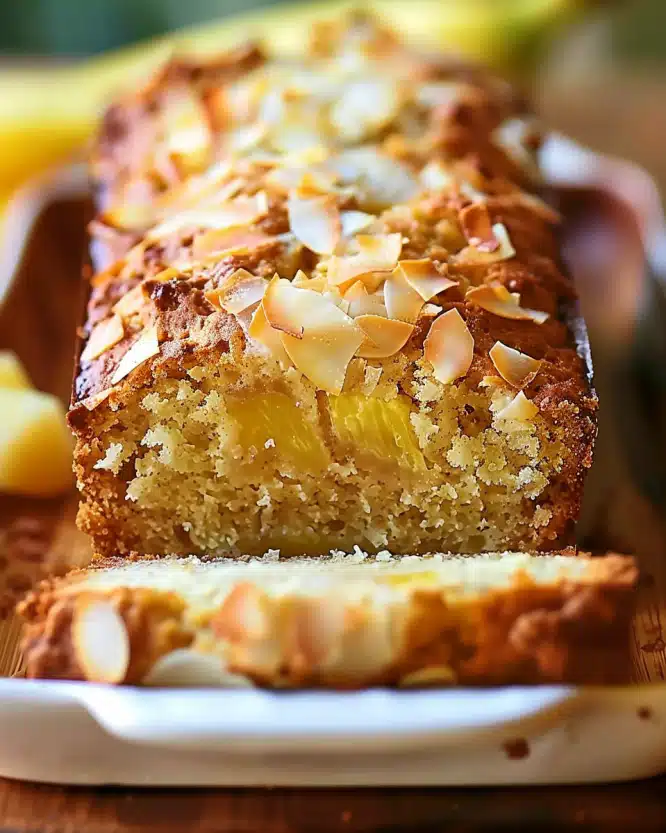
I absolutely adore sharing this Italian Bakeless Cake Recipe with friends because it’s such a delightful and nostalgic dessert. It’s bursting with tropical pineapple flavor, creamy textures, and just the right amount of crunch from the wafers and nuts, making it a perfect treat that doesn’t require any baking at all. Whenever I bring this to a gathering, I’m always asked for the recipe because it’s simple to make yet impressive in both taste and presentation.
Why You’ll Love This Italian Bakeless Cake Recipe
One of the first things that captured my heart about this recipe is the incredible balance of flavors. The sweetened condensed milk mixed with pineapple and a splash of fresh lemon juice creates a luscious, tangy cream layer that perfectly complements the vanilla wafers. It’s like a tropical breeze in dessert form, combining sweet, tangy, and creamy in every bite. Each mouthful offers a unique texture too, from the soft layers to the slight crunch of coconut flakes and pecans.
Another reason I’m so enthusiastic about this recipe is how effortless it is to prepare. No oven, no complicated techniques — just layering simple ingredients and letting the fridge do the magic. This makes it a lifesaver on busy days or when you want a fuss-free dessert for a crowd. It’s perfect for everything from casual family meals to festive celebrations, and because it’s served chilled, it’s incredibly refreshing in warmer weather or after a hearty meal.
Ingredients You’ll Need

The beauty of this dessert lies in its simplicity. Each ingredient is essential and contributes to the overall texture and flavor profile — from the crisp Nilla wafers to the juicy pineapple, and the creamy cool whip that adds a light touch.
- Nilla Wafers: These create the crunchy and slightly sweet base and middle layers that contrast beautifully with the creamy filling.
- Sweetened Condensed Milk: Adds sweetness and richness to the pineapple mixture, making it luxuriously creamy.
- Crushed Pineapple (with juice): Brings a bright, tangy, and juicy element that lifts the whole dessert.
- Fresh Lemon Juice: Adds a zesty kick, balancing the sweetness and enhancing the freshness.
- Cool Whip (thawed): Lightens the texture, creating fluffy, smooth layers that melt in your mouth.
- Sweetened Coconut Flakes: Provide a tropical flair and a subtle chewiness on top.
- Chopped Pecans: Add a nutty crunch that complements the soft layers perfectly.
- Maraschino Cherries: For a pop of color and a hint of sweet tartness that makes each slice look festive and inviting.
Directions
Step 1: In the bottom of a 9×13-inch baking dish, arrange the Nilla wafers in a single, even layer to fully cover the bottom. This will serve as the foundation for your dessert.
Step 2: In a medium-sized bowl, combine the sweetened condensed milk, crushed pineapple along with its juice, and fresh lemon juice. Stir until the mixture is smooth and thoroughly blended.
Step 3: Gently spoon this pineapple mixture over the wafers, spreading it evenly with a spatula to cover the entire layer. Be careful to distribute it without breaking the wafers underneath.
Step 4: Place another layer of Nilla wafers on top of the pineapple mixture, covering it completely and gently pressing down to ensure stability.
Step 5: Spoon the thawed cool whip over the second layer of wafers and spread it evenly all the way to the edges, creating a fluffy and creamy top layer.
Step 6: Sprinkle the sweetened coconut flakes generously over the cool whip to add texture and a tropical aroma. Then cover the dish with plastic wrap and refrigerate for at least 6 hours or overnight—it lets all the flavors meld perfectly.
Step 7: Just before serving, scatter the chopped pecans over the top for a delightful crunch. Place a maraschino cherry in the center of each slice to finish off this classic look with a bright, inviting touch.
Servings and Timing
This Italian Bakeless Cake Recipe yields approximately 12 generous servings, making it ideal for family gatherings or parties. The prep time is roughly 15 minutes, which is remarkably quick given how impressive the dessert looks. Since no baking is required, the cook time is zero, but you do need to factor in 6 hours or more for chilling time. So, the total time from start to finish is about 6 hours and 15 minutes, mostly hands-off. I always recommend preparing it the night before for the best texture and flavor.
How to Serve This Italian Bakeless Cake Recipe

When serving this dessert, I love to keep it simple yet elegant. It pairs wonderfully with fresh fruit on the side, like sliced strawberries or kiwi, which add a juicy freshness that complements the creamy cake. For presentation, I slice it into squares and arrange them neatly on a colorful platter, then garnish each piece with the maraschino cherry for that classic red pop of color.
I have also found that a light dusting of powdered sugar or a drizzle of melted white chocolate can elevate the look for special occasions without overpowering the delicate flavors. For beverage pairings, a slightly chilled Moscato d’Asti or a fruity rosé brings out the pineapple’s sweetness beautifully, while a sparkling water infused with lemon or mint works great for a non-alcoholic option.
This cake is perfect served chilled or at room temperature, which makes it very versatile—whether it’s a relaxed weeknight dessert or part of a festive holiday spread. Because it’s not overly sweet or heavy, I usually recommend serving portions about 2×2 inches to make sure everyone can enjoy multiple bites without feeling overwhelmed.
Variations
One of the best things about this Italian Bakeless Cake Recipe is how adaptable it is. If you want to switch things up, you can substitute the Nilla wafers with gluten-free vanilla cookies to accommodate dietary needs without sacrificing taste or texture. For those who prefer a vegan option, coconut condensed milk and dairy-free whipped topping work beautifully and keep that tropical vibe intact.
I’ve also experimented by swapping out the crushed pineapple for fresh diced mango or peach, which provides a different but equally delicious fruity twist. If you like a bit of extra zing, adding a teaspoon of grated fresh ginger to the pineapple mixture adds unexpected depth and freshness. Alternatively, for a richer dessert, you could replace the cool whip with mascarpone cheese whipped lightly with a bit of sugar and vanilla extract.
While this is traditionally a no-bake cake, if you want to alter the texture, you could toast the coconut flakes lightly before sprinkling on top for a deeper flavor. Each variation brings its own unique spin, but the core of this recipe remains a reliable crowd-pleaser I always return to.
Storage and Reheating
Storing Leftovers
Leftover Italian Bakeless Cake stores wonderfully in the refrigerator. I recommend covering it tightly with plastic wrap or placing it in an airtight container to prevent it from absorbing any fridge odors. Properly stored, it will keep fresh for about 3 to 4 days. Just be sure to keep it chilled to maintain the structure of the wafers and the creaminess of the filling.
Freezing
Because of the cool whip and pineapple juice, freezing this cake isn’t ideal, as the texture of the cream layer and wafers might degrade and become soggy upon thawing. If you do want to freeze it, try freezing individual portions wrapped tightly in plastic wrap and foil for up to one month. Thaw in the refrigerator overnight and note that the texture may be softer and less crisp after defrosting.
Reheating
Since this cake is best served chilled, I don’t recommend reheating. Instead, I prefer to let the dessert sit at room temperature for 10 to 15 minutes before serving if it’s too cold straight from the fridge. This short resting time enhances the flavors and softens the cool whip slightly without compromising the cake’s delicate layers.
FAQs
Can I use fresh pineapple instead of canned crushed pineapple?
Absolutely! Fresh pineapple can add a vibrant texture and flavor, but I recommend finely chopping or blending it to mimic the consistency of crushed pineapple. Just be sure to include some of the juice to maintain the moisture and sweetness in the cream layer.
Is there a way to make this dessert less sweet?
Yes! You can reduce the amount of sweetened condensed milk slightly or substitute half with evaporated milk for a less sweet, creamier filling. Additionally, choosing unsweetened coconut flakes or lightly toasting them adds flavor without extra sugar.
Can I prepare this cake in advance?
Definitely! In fact, prepping it a day ahead gives all the layers time to meld and the wafers to soften just right. Just keep it covered tightly in the refrigerator and add the nuts and cherries right before serving for maximum freshness and crunch.
What can I substitute for cool whip?
If you want to avoid cool whip, homemade whipped cream or a dairy-free whipped topping works beautifully. Just whip heavy cream with a little sugar and vanilla until soft peaks form for a fresh, fluffy replacement.
Can I make this dessert nut-free?
Yes, you can simply omit the chopped pecans or replace them with a sprinkle of toasted seeds like pumpkin or sunflower seeds for a nut-free crunch. This keeps the texture element without allergy concerns.
Conclusion
I truly hope you enjoy making and sharing this Italian Bakeless Cake Recipe as much as I do. It’s the kind of dessert that brings joy with every bite — a nostalgic, tropical, creamy treat that’s easy enough for any day yet special enough for celebrations. Once you try it, I’m confident it’ll become a favorite in your recipe collection, just as it has in mine.